|
 |
 |
|
Standard guards, specialist mods.
We stock a huge range of, mass produced, "common" pickguards— but what makes us different is our ability to modify them in-house to suit your needs.
Using the Pickguard Customiser, you can choose from a wide selection of pickup routings — and we’ll handle the rest. That means you get the speed and reliability of a production guard, with the flexibility of a custom job.
And here’s the clever bit: if the spec you select happens to match one of our stock plates exactly, the customiser knows — and you won’t be charged for any unnecessary labour. You get exactly what you need, nothing you don’t.
It’s the perfect solution if you're chasing an unusual pickup configuration, adding new controls, or just want to do something a little different — without the full custom-build price tag.
🛠️ Key Features:
-
Built from Axesrus® stock pickguards
-
Customised to order: Specifically, the pickup options.
-
Ideal for specialist mods and unique setups
-
In-house modification by our experienced team
-
No extra charge if your spec matches mass produced stock
-
Fast turnaround — no full-custom wait times
Fender®, Squier®, Telecaster® and Tele® are registered trademarks of Fender Musical Instruments Corporation and Axesrus® has no affiliation with FMIC
You’ll have to forgive the slightly grumpy tone here—but, truth be told? Custom pickguards aren’t exactly “fun.” From the stock side, the manufacturing side, or even routing them myself, it’s a headache. Years of “I don’t want to pay that” emails haven’t helped either.
So this section isn’t about showing off a dazzling product range. It’s more like: here’s what we can actually do—it might not be glamorous, but it’ll get you out of a jam.
First things first: we’re not actually making “custom” pickguards from scratch.
What we are doing is modding existing plates—re-routing, tweaking, adding extra holes. Basically, taking a pre-cut guard that already mostly matches what you need, and nudging it closer to your spec.
What we can’t do:
-
Change the outer shape
-
Move the mounting holes
-
Mess with neck route
What we can do:
We can take a plate that’s as close as possible to your spec and drill in extra pickups if you need them.
A Couple of Examples:
-
Covered Humbucker "Neck" plate? That’s standard. No extra charge—grab it, pack it, ship it.
-
Covered Humbucker "Neck, but with an extra Single Coil in the middle? Now we’re talking. We take the stock plate, slot it into the jig, and route the extra pickup ourselves. Not a huge job, but it’s dusty, it takes time, and there’s a bit of wear on tools—so yes, there’s a extra charge.
So, what’s the deal?
-
Standard plate: If you spec something we already make (highly likely if it’s a common layout), there’s no upcharge—grab it, ship it, job done.
-
Modded stock plate: If it’s basically a stock plate but with an extra pickup (or two) routed in, there will be a small upcharge. Simple, quick, and not too painful, but still extra work.
-
Blank or heavily customised plate: If your spec means starting with a “blank” plate and routing multiple pickups, the job can be done—but the charges start to creep up. The more pickups, the more complicated, the more expensive.
-
Outside our scope: Anything that involves changing the outer shape, moving mounting holes, messing with bevels, or similar? Sorry, we can’t do it.
The Bottom Line:
This isn’t a full-blown custom shop. It’s a practical way to fill gaps in our range and give you a bit of flexibility. It’s not glamorous, it’s not free, but it works.
Pickups
Choose from a range of pickup styles to suit your build.
Humbuckers
The HB Strat® pickguards are so common these days that most players don’t even think of them as a “mod” anymore. Still, it’s worth approaching humbucker routes with the mindset that this isn’t the standard setup—mainly because there are a few variations that can catch you out.
By default, we offer the bridge position routed for either an Uncovered or Covered humbucker, included at no extra cost.
Prefer a 3-screw mount humbucker? We can do that too. This option requires routing the pickguard to order, which involves extra work and carries a small additional charge.

Uncovered Humbucker
This is what I’d call the “standard” humbucker option for a Telecaster®. Technically, it’s not truly standard—Fender® usually use a 3-screw mount humbucker—but most aftermarket pickups aren’t built that way, so this layout has become the norm.
The pickup route has rounded corners that follow the shape of the bobbins, giving a clean and intentional look.
It’s cut slightly oversized to protect the coils and ensure compatibility with:
-
Standard uncovered humbuckers
-
49.2mm, 50mm, and 52mm spaced pickups
-
Trembucker® models (which are slightly larger again)

Covered Humbucker
Covered humbuckers aren’t actually that common on the Tele®. Maybe it’s the odd mix of a metal-covered pickup next to plastic single coils—but for whatever reason, most aftermarket plates default to a covered bridge route.
The covered route is cut tight to the pickup cover, leaving no gaps or wiggle room. Since covered humbuckers are slightly larger than uncovered ones, the sizing of this route is specific to them.
This is a humbucker-only route—you won’t be able to fit a covered Trembucker® here (though those are rare anyway, since they don’t suit many guitars).

3-Screw Mount
I’ve always loved the Fender® 3-screw mount humbucker. It’s rock solid, looks great, and gives you far more control over the pickup angle than the usual 2-screw mount. In my opinion, it’s simply a better design.
The downside is that it’s almost exclusive to Fender® pickups—or anyone using our conversion plates.
The route itself is much like the uncovered humbucker cavity: slightly oversized, with rounded corners to match the bobbins. The key difference is the two screw holes on the bass side instead of one, which set it apart from the more common layout.
Since this has to be routed to order, there’s a small extra charge. But if you’re into Fender’s system, it’s absolutely worth it.

MisMatch
It’s actually pretty common—especially on non-Fender® guitars—to mismatch humbuckers and routes. You can usually get away with it, but there are a few rules of thumb worth knowing:
-
Uncovered humbuckers will fit into covered routes. They’ll work fine, though you’ll see a small gap around the pickup.
-
Fender® 3-screw mount humbuckers fit into both uncovered and covered routes, since they still retain the central mounting hole.
-
Covered humbuckers will not fit into uncovered or 3-screw mount routes—the route simply isn’t wide enough.
When in doubt, a covered route is the most universal option.
Wide Range Humbucker
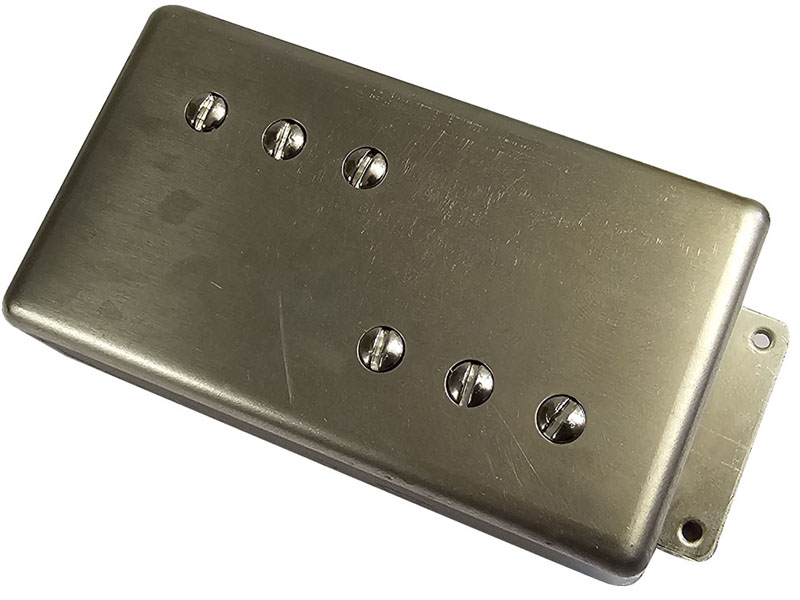
Ah, the Wide Range Tele humbucker — the legendary “big daft thing” from the ’70s Telecaster Deluxe. They’ve got a cult following for a reason: massive tone, fat single-coil bite, and a sparkle all of their own. But, if you’re thinking of dropping one into a Strat, there’s a bit to know.
The Merits
These pickups are big, beefy, and full of character. Compared to a standard Strat humbucker or single coil, they’ve got:
-
Thick, rounded lows that still articulate well.
-
Dynamic response that’s surprisingly Strat-friendly — they clean up nicely and take overdrive without losing detail.
In short: they give you that wide, punchy humbucker sound without going all muffled like a standard Gibson-style humbucker.
The Drawbacks
Here’s only really the one catch: Wide Range humbuckers are huge. Their covers are longer and wider then a "normal" humbucker!
Sound Expectations
If you can make it fit, expect:
-
A bigger, fatter bridge tone than any other "Fender style" pickup
-
Sparkle and clarity that keeps it from sounding muddy.
-
A unique voice that’s somewhere between Tele bite and humbucker warmth — really fun for blues, rock, and even some jazz.
Sensible Verdict
Fitting a Wide Range Tele into a Strat is absolutely possible, but it’s a project — you’re not just swapping a pickup. Expect routing a slightly fiddlier setup. But if you love that big, jangly-yet-fat tone, it’s a mod worth doing.
A Potted History
The original Wide Range humbuckers came out in the mid-1970s for the Telecaster Deluxe and Custom — the real deal, with CuNiFe (copper, nickel, iron) magnets that gave them that bright, snappy bite without losing warmth. They were big, jangly, and instantly recognisable.
Fast forward to 2004: Fender tried a comeback, but it was basically a normal humbucker in a giant cover — output was higher, tone was muddier, and it really didn’t capture the magic of the originals. Fans were underwhelmed.
More recently, Fender and other makers have flirted with “historic recreation” versions. Some nail the original CuNiFe vibe, some fall somewhere in-between — the “are they/aren’t they?” debate still rages. But the idea is the same: try to get that vintage Tele Deluxe humbucker tone in a modern package.
The nitty-gritty: Wide Range humbuckers mount with four height-adjustment screws, and the covers and baseplates are much bigger than a standard humbucker to accommodate the larger bobbins. This was originally a deliberate “thing” to differentiate them from Gibson humbuckers — and it’s part of what gives them a sound all their own.
P90s
Many of us have probably had that thought at some point: “Wouldn’t P90s be cool?!” The idea of a P90-loaded Tele® is seriously tempting, especially if you don’t want to jump straight into a big hollow-body or some other oddball guitar. It’s a fun way to explore what P90s are all about without stepping too far outside your comfort zone.
I’m all for it — but go in with your eyes wide open. Installing P90s is absolutely doable, but there’s a reason it isn’t all that common. They present a few unique challenges, especially when it comes to balancing them with other pickups in the guitar.
Electrically speaking, P90s are loud. They induce around 7–8 Henries of inductance, which is a significant jump compared to other pickups. As a general rule, it’s best to keep the difference between pickups around 2 Henries or less for them to balance well. This is particularly important if the P90 is in the bridge position, and even more so if it’s in the neck.
To put it in context, most vintage-style humbuckers are around 4–5 Henries, and most standard single coils (Strat, Tele, etc.) are around 3 Henries. Mixing a P90 with either of these — whether in the same guitar or in the same circuit — will almost always result in a noticeable volume mismatch.
There Are 2 Different Sizes
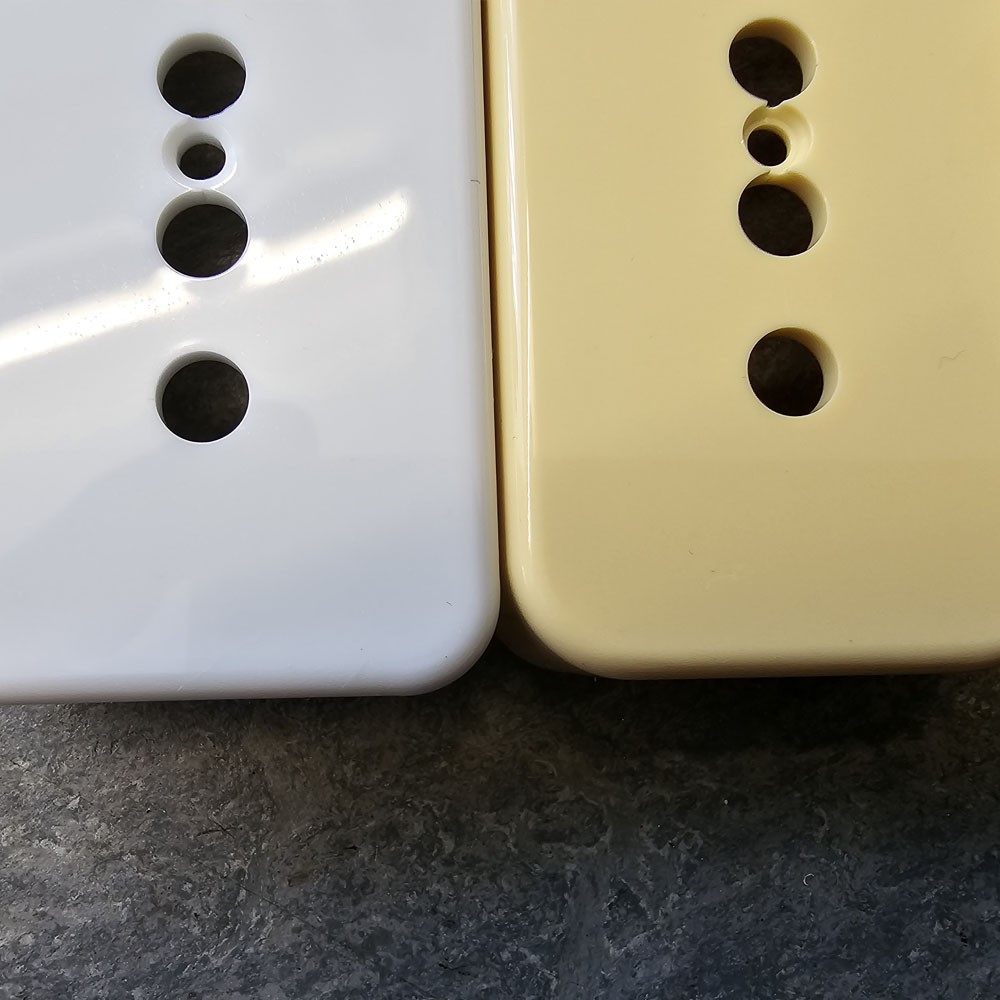
This isn’t (weirdly) widely known — but soap bar P90s actually come in two different “sizes.” I go into more depth in the Pickups section, but in short: there are Epiphone®-sized and Gibson®-sized soap bar P90s.
They’re slightly different overall dimensions — Gibson® uses a slightly smaller footprint, but it’s only marginal. The main difference is in the corner radii of the covers:
We route to the Epiphone® size and shape, so Gibson®-sized P90s will technically fit the route — but there’ll be a mismatch at the corners due to the larger radii.
Epiphone Size
I’ve spoken to a few people over the years — most of them pickup manufacturers! — and this isn’t as widely known as you might think. Presumably that’s because very few people ever bother to replace Gibson® P90s.
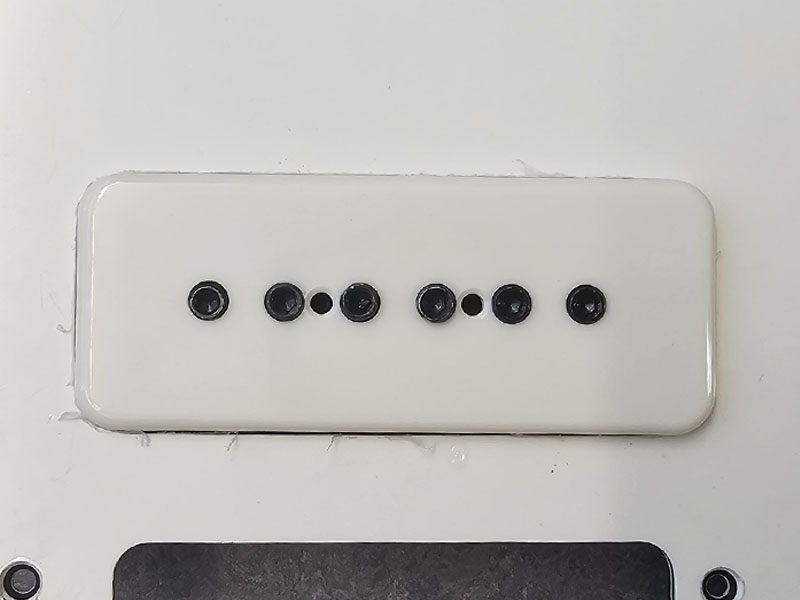
Gibson-sized P90s will technically fit into the Epiphone route, but just to show the difference: here’s an Epiphone P90 (at least, the cover) in our P90 route. It’s a nice fit; the radius matches in the corners, and there’s a little wiggle room to get the pickup in there and centred.
Remember, as with all surface-mounting pickups, do as much as you can to get the pickup square to the hole before committing to mounting. Unlike “hanging” pickups (humbuckers and single coils), a P90 won’t “self-centre” in the route, so it’s very possible you’ll end up off-centre if you’re not careful.
Epiphone Radii
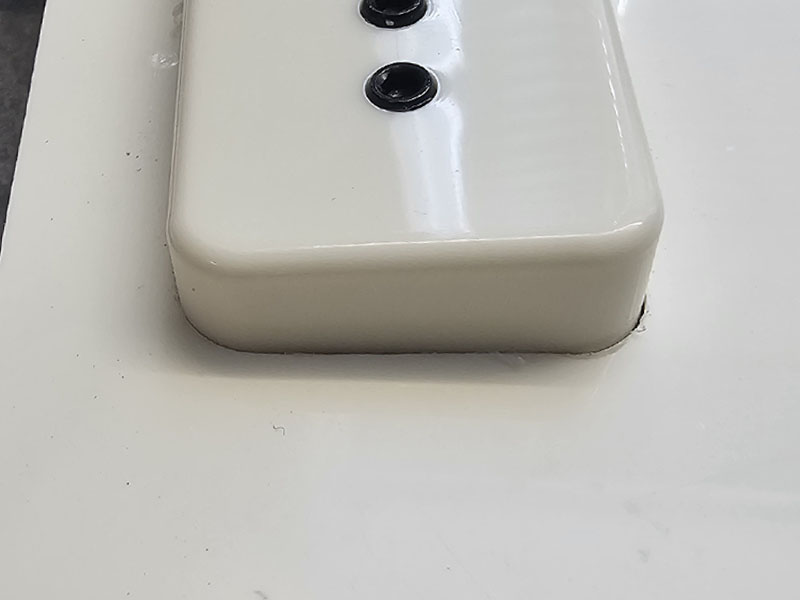
Just a quick close-up on those radii — see how the curve of the route matches up nicely? Thats a 6mm radius in the flesh. That’s what I’d consider close to perfect personally. There’s just enough “slack” in the route for the pickup to travel freely, without huge gaps.
Interestingly — and partly one of the reasons I dislike the idea of a P90 Strat® — Epiphone P90s only come in 50 mm, and very rarely, 47.5 mm string spacing. This is quite narrow on a Strat®, especially in the bridge position, so it’s unlikely you’ll get perfect string alignment with the poles.
It’s not a massive concern from a tonal perspective, but if string alignment is something that bothers you, it’s worth keeping in mind.
There is, undoubtedly, someone somewhere who’s made an Epiphone-sized cover in 52 mm spacing (and presumably commissioned the bobbins and base plates to make the pickup). But, you know, there’s always someone pushing the boundaries in pickups — so, a little cynicism is warranted. For me, I’ve only ever seen 50 mm / 47.5 mm as standard.
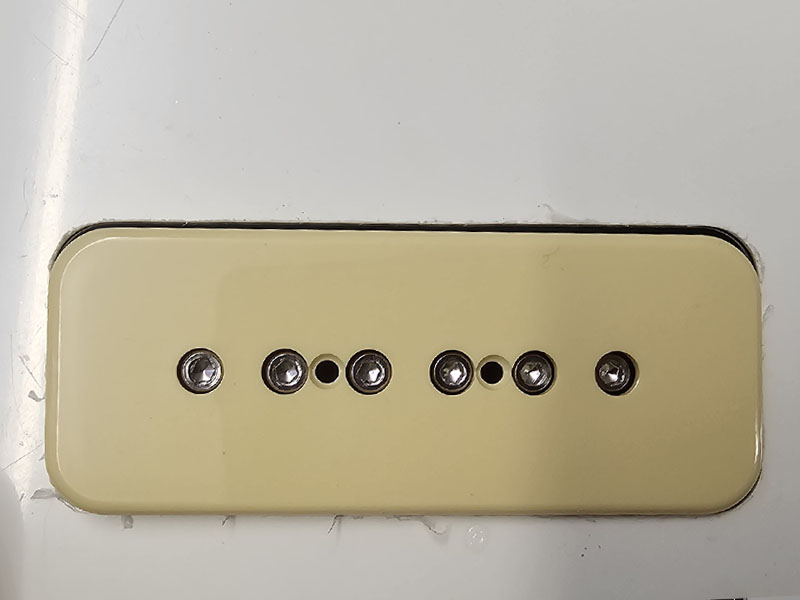
Gibson Size
Now, that’s not something I massively love, to be honest — a Gibson® P90 (cover) in our route (which is shaped for Epiphone® size) clearly shows the size difference. It fits, and with a bit of work centering the pickup, it’ll probably look okay, but it’s certainly not as neat as an “Epi in Epi” routing.
Moving forward, if there’s demand, we’ll probably offer the Gibson® routing alongside the Epiphone® one. But — and I can’t stress this enough — very few people actually know they’re different sizes. As always with this stuff, if no one’s asking, I’m a little in the dark about the level of demand.
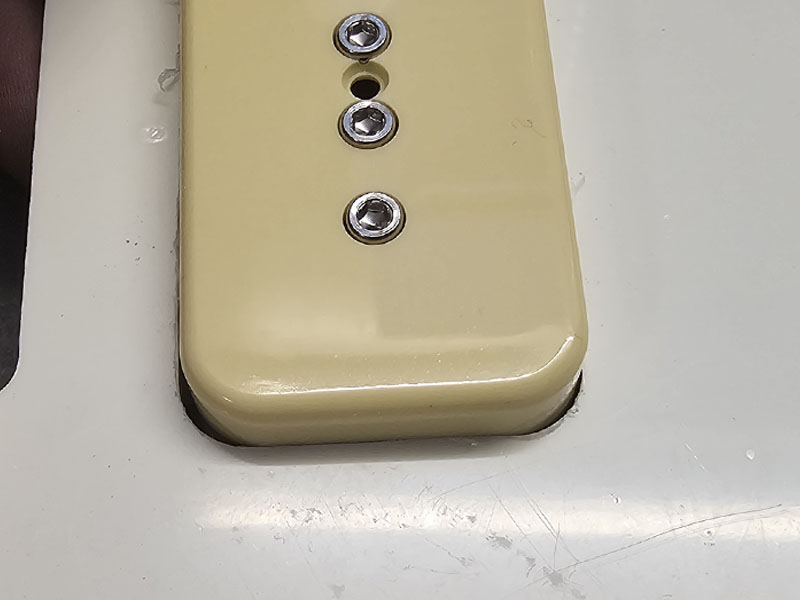
Gibson Radii
And, because I like to be transparent about this stuff, here’s the main difference between the sizes — the radii in the corners. Gibson® covers are slightly more rounded at 7 mm, which almost clashes with the 6 mm in the Epiphone® route.
Interestingly, Gibson® P90s are always 49.2 mm. The same rules apply as with Epiphone®: it’s a little narrow for a Strat®. But if you’ve got your P90 in front of you and you’re unsure whether it’s Gibson® or Epiphone® size, measure the pole spacing. That should tell you what you’ve got — and, who knows, it might even give me enough of a nudge to actually make the Gibson® size route a reality!
Single Coils
“The Normal Stratocaster® Pickup”
It’s a bit of an oversimplification to call these just “single coils.” Strictly speaking, Telecaster®, Jazzmaster®, Jaguar®, and even P90 pickups are all single coils as well. But for whatever reason, when someone says “single coil,” most of us immediately picture a Strat® pickup.
Strat-style pickups are very much “Fender®” in how they’re built — and unmistakably Fender® in how they sound. I think most of us know what a Strat-style single coil does, so I’ll spare you a full-length deep dive.
That said, there are a few quirks unique to the Stratocaster® layout that are worth touching on, along with some interesting alternative options we offer.

Neck and Middle "Standard"
Why? Honestly, I’m not sure — and I doubt it’s a particularly exciting story. Maybe it was A/B tested and “flat” just sounded better. Or maybe it was never questioned in the first place; the Telecaster® didn’t do it, and neither did most other early electrics.
It’s mostly academic, because (and I write this sentence more often than I care to admit): we like what we know. If you like a Strat®, chances are you like the sound of a flat neck and middle single coil.
Slanting those pickups would change the sound — but they’re not slanted, so they don’t. The high and low strings are picked up from the same position, which means the low strings tend to come through a little more prominently in the mix.

Middle "Slanted"
With single coils, there’s really only so much you can do with the idea, but one of the more popular “tweaks” is to have them slanted at the same angle as the traditional bridge single coil pickup. And yes — it’ll have the same effect: the high strings feel a little tighter, and the bass strings feel a little fuller.
Personally (and I’ve written this a lot in this write-up) — this is getting dangerously close to being wildly unfamiliar. We usually only like what we know when it comes to guitar tones, so if you’re hunting for a tone you’ll instantly recognise, tread carefully.
Interestingly (and this comes up every so often) — Jake E. Lee? His single coils were reverse slanted, meaning tighter bass strings and fuller highs.

Middle — Reverse Slanted
This one’s really just a case of filling in the gaps. Angle aside, it’s what I’d class as the Jake E. Lee setup — reverse-slanted single coils in the neck and/or middle positions.
There’s not a lot of mystery to it: take the usual bridge slant, flip it the other way, and stick it in the neck or middle slot. That’s the whole trick.
In terms of real-world examples, Jake E. Lee is the only player I can think of who’s genuinely used it and made it part of his sound. I did see Paul Gilbert playing an Iceman recently with the middle single coil slanted in reverse (and the humbuckers as well), and tonally it did exactly what you’d expect — tighter, brighter lows and slightly thicker high strings.
Do I love it? Personally, I’m not sold — but it’s different, it works, and it definitely earns its place on the list.
“Double Single Coils"
Double Single Coils were, frankly, rare. Off the top of my head, I can only think of Robbie Robertson and his Last Waltz Stratocaster as a “known” example, and even then, it’s a bit of a left-field case, because the guitar wasn’t widely recognized until Fender released it as a (very short-lived) signature model. It’s a beautiful guitar, so I can see why it gained attention, and the main point of note was the “Double Single Coil” concept.
While Robbie, if not the inventor, was certainly an early adopter of the idea, Fender actually dabbled independently as well, with the 1990s Stratocaster Ultra, which sported a Lace “Dually”—essentially two single-coil-sized humbuckers wired in series. The routing was a “flat” Double Single Coil setup (whereas Robbie’s is a slanted version).
Either way, Fender revisited the concept more recently with the Squier Contemporary series, which featured a slightly different setup again (slanted this time, with the single coils very close, but separated). It’s a nice idea, and it has potential, but there are a few considerations.
Firstly, electrically, it’s not advisable to wire a “Double Single Coil” as though it’s a standard bridge and middle combination. The pickups are so close together that, assuming the middle coil is reverse-wound/reverse-polarity, using them both in parallel will induce significant phase cancellation, making the output almost unusable.
It’s better to follow Robbie’s approach and wire the two pickups in series, so they essentially act as a humbucker. The result is big, beefy, and aggressive—but a little unfamiliar. With an inductance around 6–7 Henries, it may feel slightly “loose and lardy.” It’s something different, certainly usable, but don’t expect Gibson-style tones just because it uses two coils.
They do, too, bring up a few weird quirks, so, lets cover some of the finer points too.

“Double” Slanted
I’ve maybe muddied the waters a little speaking about the Ultra Strat and Squier’s take on the idea, so for 100% clarity, our “double single coil” looks like this: two single coils, side by side, as part of the same route.
It retains the ethos of what Fender® initially intended with the bridge pickup (which is really useful if you’re considering coil-splitting the pickups!) and, frankly, the rule of cool triumphs here. It’s what Robbie Robertson did, so we’ve carried that idea over too.
Note: the mounting screws — the route assumes you’re fitting two single coils, so that’s two screws for each.

“Double” Flat
This setup is closer to the old Fender Ultra idea — two single coils acting as a humbucker, but mounted flat, like a traditional full-size humbucker, rather than on a slant.
Just to be clear: we’re assuming you’re not using an early Lace Dually here. Those had a metal “conversion plate” joining the two pickups together, so they mounted with a single screw at the bottom (near the volume pot), rather than four individual screws.
Later Dually models changed again. They’re built on a Fender humbucker-style base — what we call a 3-screw mount — and are designed to drop into uncovered humbucker routes. Technically, they’re still just two single coils wired in series, but when it comes to mounting, you're better off treating them like a standard uncovered humbucker these days.
Tonally? The “double flat” setup is a bit of an unknown. By removing the slant (on the bridge), you’re naturally going to brighten the treble strings and darken the bass side — that much we can safely assume — but if you’re using regular single coils rather than anything purpose-built, it’s hard to make any confident predictions beyond that.

Doing It “Wrong”
If you’re chasing this setup, you’ve probably worked out you “need” a bridge pickup and a middle pickup — one standard wind, one RWRP. The obvious issue is that the bridge pickup will foul the middle unless you spin the middle pickup around to make it physically fit.
That solves the clearance problem just fine… but it does mean the pole staggering ends up “the wrong way round.”
Honestly? I don’t think it matters. Once you’re wiring them in series, the tone is going to be so unfamiliar anyway that a bit of odd string balance is the least of your worries. But if you’re treating this as a labour of love, I get why it might still bug you.
This same logic applies if you’re doing it with a neck and middle combination — the neck pickup is effectively “flipped” in the same way to clear the middle, with the same pole-piece quirk as a result.
Yes, it’s confusing. You're not going mad.
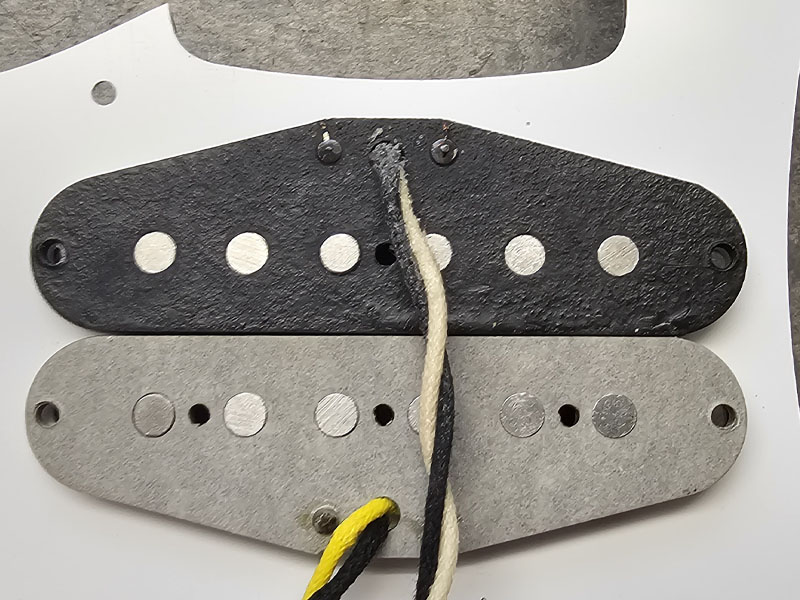
Under the Hood – Neck
Running a “double single coil” in the neck brings the same headache as with the bridge: you’re effectively spinning the neck pickup, while the middle pickup stays in its normal orientation.
Ignoring pole staggering for a moment, the main issue is physical space. A standard neck route simply isn’t designed to take two single coils side by side, so you’re almost certainly going to run out of room.
Is it doable?
Yeah, absolutely — but expect a bit of woodworking. You’ll likely need to remove a small amount of timber from the pickup cavity to make it fit. It’s not a huge job, and if you’re lucky enough to have a swimming pool route under the pickguard, you might get away with minimal work. But if you’re trying this with “normal” single coils, go into it knowing that a chisel, router, or sanding drum may need to make an appearance.

Doing it Right
Personally, I like the pole staggering to be the “right” way around. It doesn’t necessarily save the idea for me — tonally, it’s just a bit too big for my tastes — but visually, it feels more intentional. It looks like a design that’s been thought through, rather than just “hey, let’s route out some more holes!”
Really though, this comes down to how much you want to invest in the idea. If you’re right-handed, chances are you don’t already have a left-handed pickup sitting in the parts box (and in this example, I’ve even used a side-loading pickup). That means you’re probably going to have to buy one.
And remember: you’re spending money to chase a sound that, realistically, you’ve probably only ever heard in the hands of one man. So if it’s worth anything — give it a go! You might love it. But my advice? Try it “wrong” first before throwing cash at it.

Refinement
And this is what it looks like under the hood if you’ve got access to every pickup under the sun — and the only band you ever listen to is The Band! A regular single coil sits in the bridge slot, paired with a side-loading single coil in the middle.
This way, you can match the pole staggering without spinning pickups around, and you also save a little space in the routing. It’s neat, tidy, and looks properly intentional.
It’s also a very clean way to wire the pickups in series. Here’s the basic idea:
-
Connect the middle to the bridge
-
Splice the wires
-
Add a coil-split option
-
Instead of hardwiring the splice, route it through a mini switch or push-pull pot.
-
Flicking the switch breaks the series link, leaving just the bridge pickup active.
Simple, effective, and much more versatile — while still keeping that “double single coil” flavour intact.
Mini Humbuckers
Mini Humbuckers are, frankly, a little bit strange. As near as I can tell, they exist largely because Gibson had a surplus of P90 Les Paul bodies they couldn’t give away. To make use of the design, they acquired a relatively small jazz guitar manufacturer from New York to adopt their Mini humbucker design — which they then mounted in “rings” made from cut-down P90 covers.
Whatever the truth behind the story, that’s how Mini humbuckers became part of the mainstream, and how Epiphone ended up with them.
Basically, they’re smaller than “proper” humbuckers and somewhat limited in what they can do, coming in two main “flavours”:
-
Traditional — with six exposed screw poles and a covered “rail” pole on the other coil. Almost always wound to 6K, sitting atop a bar magnet.
-
Firebird — a completely enclosed cover with two bar magnets pressed into the coils. Weirdly, they don’t behave all that differently from the traditional version, considering how unusual the construction is. They’ve had a bit of a resurgence in recent years.
Personally, I’ve never been a huge fan. In my opinion, “once you’ve tried one, you’ve tried them all,” since the size and shape limitations make them all sound pretty similar. They’re a lot less defined than a normal humbucker, soupier under gain, but incredibly pleasing if you keep things clean and classy.
Interestingly, there’s a lot of confusion around size. Most Mini humbucker rings are designed to accept a 68 mm pickup, so technically 68 mm Mini humbuckers should exist. In practice, though, I’ve never seen one — my suspicion is that the pickups themselves are actually closer to 65 mm where it matters, and the “68 mm” spec only applies to the flared base.

In situ
I think it’s fair to say that, on the pickguard, it’s pretty clear there’s something not quite right with the routing, isn’t it? That route is 68.5 mm × 28.5 mm, with the correct radii in the corners — and, even I’ll admit, it’s a little gappy.
Sadly, I’m playing this a bit by ear. I’ve got covers (and pickups) from a few different manufacturers in front of me, and they’re all slightly smaller than 68 mm × 28 mm. That said, it seems the entire industry is working to those numbers, so I’ve got to fly with the wind a little and route our plates to match that, purely because there’s a very real chance your pickup will be exactly those dimensions.
In short, just because all of my examples are slightly under, doesn't mean all pickups are slightly under.

Good Company
And before everyone tells me, “Craig, that’s stupid — if the pickup is 65 mm long, then route the pickguards to match!” — I agree! Honestly, I do. But everyone else is working to 68 mm length. Remember those cut-down P90 covers? They’re assuming 68 mm — and, with the examples I’ve got here, we’re seeing the same gapping around the route.
Weirdly, even though the dimensions of the route are exactly the same, the gapping looks less. I assume it’s some trick of the eye, and the shadow gap hides a multitude of sins. If we deep dive a little (and, clearly, I have!) — we can see the same shadow gap on Gibson Les Paul Deluxe and even Firebirds, which gives further credibility to this being a fairly wide-ranging quirk.

Full Disclosure
I’m in a bit of a tricky spot here — I could, quite easily, tweak the routes on my end and make a mini humbucker cavity 65 × 27 mm (in the same way I could make a Gibson P90 route). The thing is, very few people actually measure these pickups. More often than not, the first you’ll know your Mini HB is smaller than expected is when you try to fit it into the route.
Honestly, it’s better to err on the side of a slightly bigger hole than a smaller one. It saves a lot of “What size is my mini humbucker? No clue, sorry!” emails, and, frankly, it aligns with how the industry tends to do things.
If there’s enough demand, I’m absolutely open to creating a more precisely sized route — but so far, it hasn’t come up. This approach keeps things simple and practical, without anyone losing sleep over it.
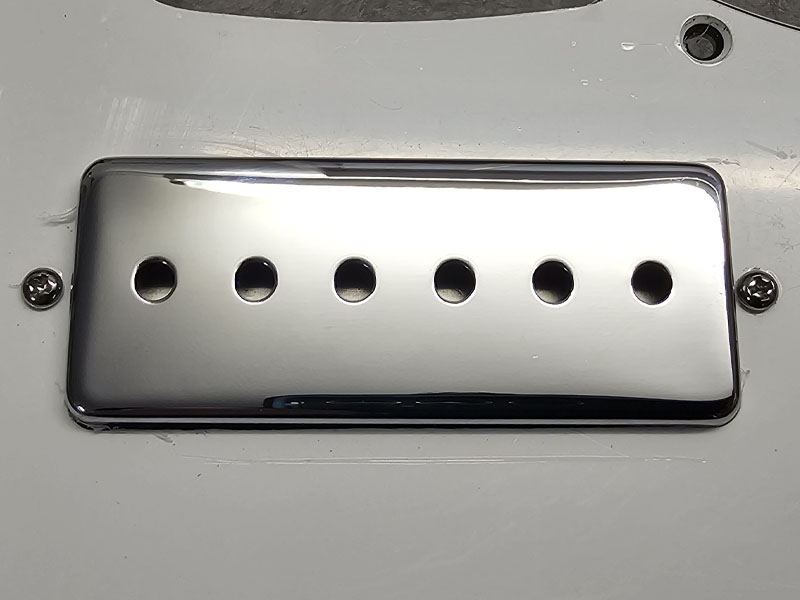
It CAN Be Done
OK, so (writing this in November 2025) — I was getting annoyed with the slightly oversized mini HB routing, so I made a second jig that’s the “correct size” for the covers and pickups I’ve got here.
While I won’t muddy the waters by listing it in the drop-downs, if you want it “tighter,” give me a shout on the contact page and we can make it happen. By default, we’ll route to the “normal/oversized” size, as everyone else seems to be doing — but, you know, at special request, we can go tighter.
Telecaster Pickups
I’ve got to give an old mate some credit here — Karl, if you’re reading this, fair play! You were the first person I knew who actually thought this would be a good idea.
Right then — I think this is something most of us have considered at one point or another: Tele pickups in a Stratocaster. All the things that make the Telecaster a great guitar, loaded into something that’s arguably a bit comfier, a bit more rock ’n’ roll, a bit more versatile.
And honestly? It’s not the worst idea at all. Tele bridge pickups have a lot more scope for variation — there’s more space for the coil, no cover limiting the height, and you can experiment with baseplates, resistance, and wire gauge. It’s fair to say there are dozens of viable Tele bridge pickup specs out there.
That’s not quite true for the neck pickups, though. They’re almost the opposite — smaller coils, typically limited to 43 AWG (or thinner), and that iconic metal cover restricts height. If there are dozens of Tele bridge options, there are maybe three or four neck variations worth talking about. It’s not a dead end, but go in with your eyes open. Great if you’re building a Strat-o-Tele hybrid, but tonally? There are better options than the traditional Tele “lipstick” pickup.
Now, most people won’t care one jot about that, because, let’s be honest, it’s the bridge pickup that everyone’s excited about. “All that Tele twang on a Strat?!” Well… here’s the thing: Telecaster pickups aren’t actually that different from standard Strat pickups. They’re usually a bit hotter, but not inherently “twangier.”
What’s really doing the heavy lifting on a Tele is the metal bridge plate the pickup is mounted in. (I’ve got the graphs if anyone wants to see them!) Being surrounded by that steel plate changes the pickup’s response — it adds snap and bite — and that’s something you just can’t fully replicate on a Strat.
So, full disclosure: it’s a cool mod, and yes, you can absolutely load Telecaster pickups into a Strat. But you’re probably not going to make it sound like a Telecaster. You’ll end up with something more like a muscular Strat — which isn’t a bad thing at all. There are other, perhaps better, ways to chase that sound, but that’s a topic for another day.
“Proper” Neck (and Middle)
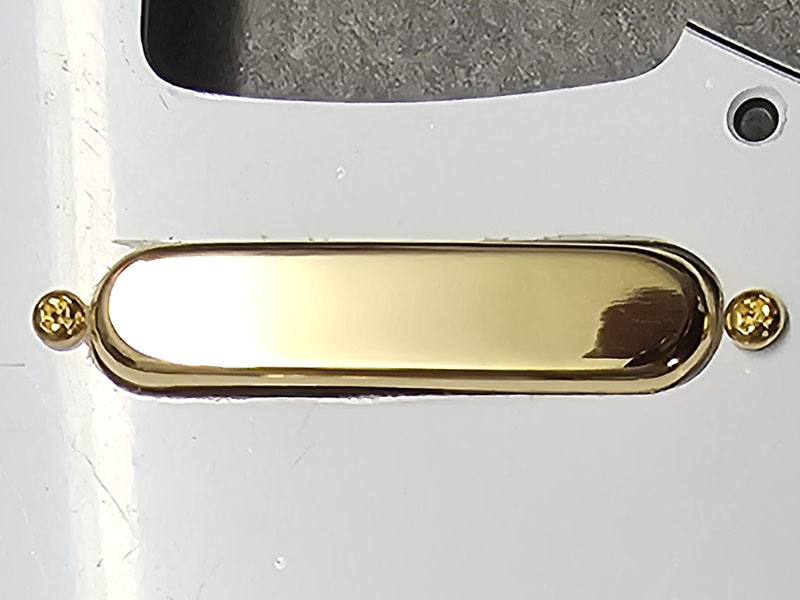
I’m sometimes a bit down on the traditional “lipstick” Telecaster pickup — it’s hamstrung by its size, shape, and that metal cover. They all sound very similar (and I’ll die on this hill!). Forget resistance, magnets, even cover material — Tele lipsticks just sound like Tele lipsticks. They’re a little too warm, a bit wimpy, a bit ill-defined. They look cool, sure, but… well, the most common request we get for Tele pickups is: “Can you make my Tele sound like a Strat in the neck slot?” (We can!)
Now, I won’t browbeat anyone for wanting to go that route — and if your heart’s really set on turning a Strat into a Telecaster, a lipstick pickup is a no-brainer. But I’d strongly suggest thinking of it as a bit of a “warts and all” conversion. Unlike the bridge pickup, lipsticks will sound just like they do in a Telecaster — and, honestly, it’s a bit… uninspiring.
(I type this donning my tin helmet and awaiting the assault.)
Either way, in the neck and middle slots it’s as you’d expect — they’re mounted “flat,” just like on a Telecaster, using two height-adjustment screws either side. Again, there’s a bit of variation in the size and shape of Tele lipstick covers, so the routes are slightly oversized to avoid any fitting issues.
Jaguar Pickups
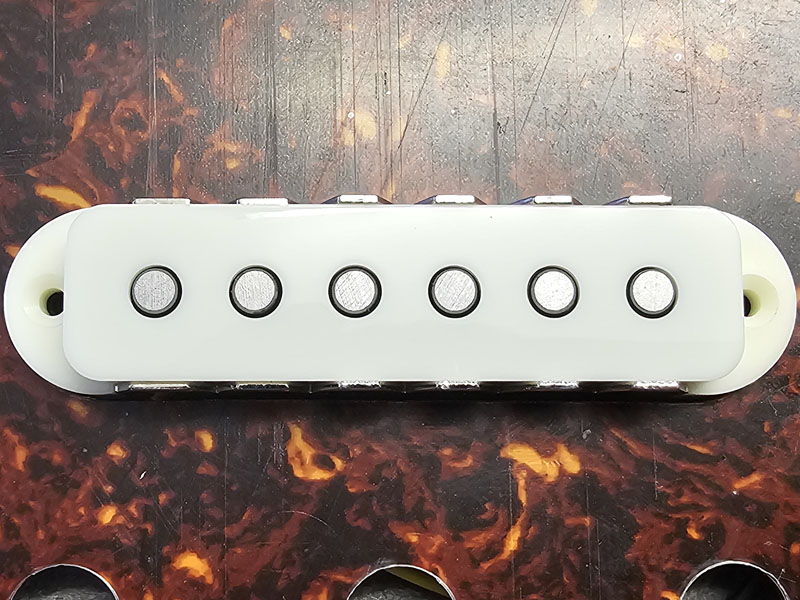
A slightly left-field choice this one — but a really cool one all the same. Jaguar pickups look great on a Strat, and they’ve got a sound that’s got a bit more snap and bite compared to a regular single coil.
They share a lot in common with Strat pickups, but the big difference is the metal “claws” around the coil. They focus the magnetic field and scoop a touch of midrange out, which gives that lovely, bright, percussive tone — a bit surfy, a bit hi-fi, but still nice and musical. If you’re after something clean, jangly, and with a slightly tighter top end than a Strat pickup, these really deliver.
Fitting-wise, we’ve accounted for them properly here — they’re longer than a standard Strat single coil, and they use different mounting screws, but it’s all built into the customiser. Just choose the Jaguar option and we’ll route the guard accordingly.
There are a couple of little quirks to be aware of: height adjustment can be a bit more limited than a normal Strat pickup (since Jags sit flat to the guard rather than “hanging” from it), and they don’t drop straight into a standard Strat route. But, if you’re going for something that looks unique and sounds a bit sharper and more articulate, they’re a cracking choice.
Mounting
Right, here’s the thing: Jaguars weren’t designed for Strat pickguards, and it shows when it comes to mounting. On a Jaguar, pickups are surface-mounted — they sit flat on the body and the metal claws are screwed directly through the cover. Height is adjusted with those screws, aided by a tiny bit of foam underneath. It works fine on a Jaguar because the body and pickguard were designed around it.
On a Strat? Not so much. Standard Strat pickups hang from the guard with screws and springs underneath. That means
-
Height adjustment is trickier — on a Strat guard, the pickup sits flat, so you’re limited to fiddling with foam or shims, which is far from elegant.
-
Squaring it up is a pain — the pickup is longer than a Strat single coil, and keeping it perfectly straight on the guard is fiddly.
The Claw!
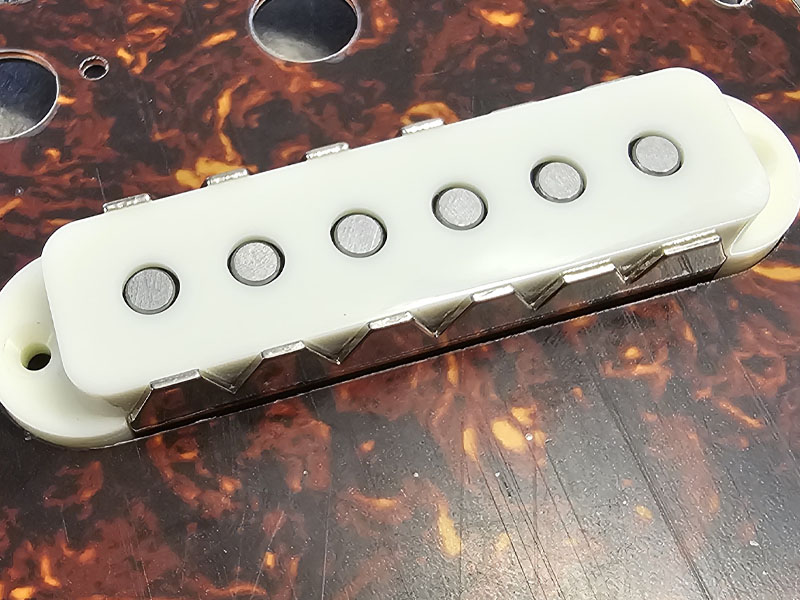
That metal claw around a Jaguar pickup? It’s not just decoration — it’s doing some serious tonal work.
Functionally, the claw acts a bit like a horseshoe magnet, similar to the way a Burns Trisonics base plate works. It effectively gives the pickup three magnetic poles, which shapes the string’s magnetic response in a unique way. This helps produce that bright, percussive attack Jaguars are known for, while still keeping the tone balanced.
On top of that, the claw:
-
Focuses the magnetic field: Directs the pull toward the strings, giving a sharper, snappier response.
-
Reduces stray interference: Enclosing the coil on three sides adds a touch of shielding — cleaner signal, less hum.
-
Shapes the midrange: Scoops out a bit of mids, giving that jangly, chimey character without harshness.
So, it looks like a funky chrome frame, but it’s actually a clever bit of magnetic engineering. Take it off, and the pickup loses a lot of that distinctive Jaguar sparkle — it’s not just cosmetic, it’s core to the sound.
Filtertrons
Filtertrons are cool — like, undeniably cool. From the very first Gretsch versions in the 1950s through their reinvention in the ’90s with TV Jones, they’ve always carried this sort of counter-culture status — lurking just on the outskirts of PAFs, high-output humbuckers, and every “ever more stratty” single coil. They’ve found their home in the hands of some equally cool players too — Brian Setzer, Malcolm Young, Chet Atkins — and they’ve got a tone that’s completely their own.
From a simple point of view, they’re not quite as large as a full-sized humbucker, but a touch bigger than a mini-humbucker. Electrically (and internally), they’re a bit odd: fairly small coil geometry, but high inductance thanks to the larger poles and magnets. The result? They’re bright, raunchy, and somehow still well-behaved — quite the contradiction in terms!
English Mount
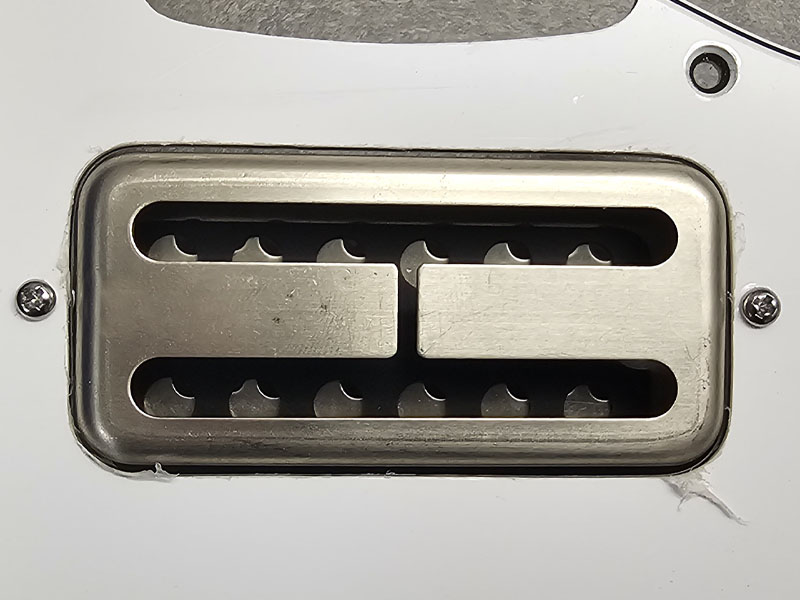
Thankfully, this is about as simple a write-up as it gets. Filtertrons come in two “styles” — we’re offering Strat plates with the English mount, which is just a fancy way of saying “hanging from the pickguard.” Honestly, it’s the best way to do it on a Strat.
Traditionally, Filtertrons are surface-mounted — usually with a goof ring around them to cover any questionable routing — and then propped up with a bit of foam. That works, but it can be a bit of a pain to adjust the heights. And since you’re shoehorning these pickups onto a Strat anyway, if you’re going to those lengths, I’d strongly suggest going for the English mount.
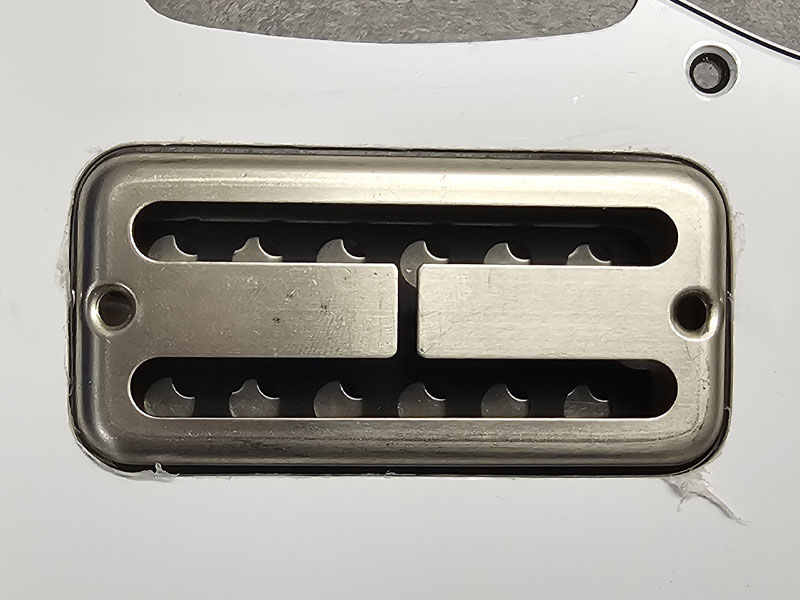
Surface Mount
And the opposite of English mount? Surface mount — the pickup is screwed directly to the body, with the height adjusted using foam underneath.
I wouldn’t go for it myself. It’s tricky to get the pickup perfectly square to the pickguard, and REALLY difficult to get the height just right.
.
Colours
Ok, even I’ll concede this isn’t the most thrilling topic at this stage — but there’s a surprising amount of confusion around the various “off-white” pickguard colours. And seeing as we’re already ticking off pearls and tortoise shell variants, we might as well tackle the parchments, mints and creams too.
So, let’s get stuck in.

White
All our white plates use this exact shade — a fully opaque pigment with no translucency or ageing tint. It’s exactly what most people picture when they think “white pickguard”: clean, crisp, and pristine.
It doesn’t try to mimic vintage plastics or look “aged in,” so if you’re after a bright factory-fresh look — or you’re pairing it with bold or modern colours — this is the one.

Parchment
Sometimes sold as “aged white,” parchment sits one step in from pure white. It’s a touch darker, with a hint of cream or yellow in the mix — think along the lines of old newspaper or paper that’s had a few decades to mellow.
It’s a great middle ground if you don’t want the starkness of bright white, but you’re not ready to dive into full-on cream or mint territory.

Mint A
The lighter of the two mint shades. It’s not actually all that common on production guitars, which surprises a lot of people, because this is the tone most folks picture when they think “mint green.” It’s subtle, soft, and only just tinted — enough to take the edge off white without straying into cream.

Mint B
The “proper” mint green. Darker than Mint A, with a subtle grey undertone that gives it depth. Be warned — it does not photograph well and will often be corrected by cameras into something lighter or more vibrant than it actually is. In real life, it’s a rich, deep green, much closer to the discoloured nitrate plastics of the 1960s, which this colour originally sought to replicate.

Ivory
Ivory — sometimes called “Creme,” particularly in Gibson parlance — is a warm, buttery shade with a hint of orange. It’s not commonly seen on Fender-style pickguards, which makes it a bit special, but personally, I absolutely love the richness it brings to a build.

Black
Black is, well… black. There’s not a huge amount to say about it — it’s opaque, crisp, and very classy. I particularly like the contrast it creates on 3-ply pickguards with a white middle layer; it just works.
Mint Green Notes
Before we dive any deeper into colours, a few things are worth flagging about Mint Green — it’s a tricky shade and often comes across completely differently in photos.
First, if you’ve looked at the “real” photos of Mint A and Mint B, you’ve probably noticed they look almost identical. That’s not a mistake — cameras genuinely struggle to capture the subtle differences. They tend to auto-correct everything toward a washed-out Mint A, regardless of the actual plate.
So, why bother showing photos at all? Well, the unedited images highlight how misleading camera shots can be. From here, you have to trust the edited examples above, or the colour swatch in the pickguard customiser — that’s a very accurate representation of what the plates look like in real life.
The takeaway? Don’t rely on photos when judging Mint Green. If I’ve had this problem, so has everyone else. A quick search online will show you at least ten subtly different mint shades on Fender guitars — but in reality, Fender almost always used Mint B (with the exception of Fender Japan). Over the last 20 years, I’ve come across just four actual Mint Green shades: B, A, a very bright “snot” green, and a slightly lighter version of B that’s still pretty close.

Mint B
Unedited, Mint B looks nothing like this in real life. It’s a much darker green, with an almost greyish tint that gives it that classic, slightly aged 60s vibe.

Mint A
Mint A is actually quite close to this, though in real life it’s a bit more vibrant and not quite as “washed out” as the photo suggests.

Comparison
When Mint A and Mint B are photographed side by side, alongside a few other colours (in this case, White and Parchment), it provides a much clearer sense of the differences between the shades.

Ivory vs. Ivory/Black/Ivory
We actually carry two different Ivory plates. There is Ivory, available in a 3-ply Ivory/Ivory/Ivory version and a single-ply version, and we also have Ivory/Black/Ivory 3-ply, which is now obsolete but survives in old stock.
These are not the same colour. The Ivory/Black/Ivory plates will not match Ivory single-ply or Ivory/Ivory/Ivory plates. The I/B/I plates are closer to a nicotine yellow, whereas the I/I/I plates are much more of an orange “cream.”
Pearloids Explained
Pearloid pickguards are often lumped in with tortoiseshells, but they occupy their own, slightly shinier niche. They’re not as subtle as tortoiseshells — the swirls and patterns are more pronounced, with a pearlescent effect that catches the light beautifully. Historically, they’ve been a relatively straightforward affair: virtually all pearloid pickguards are made from PVC, and there isn’t a deep, mysterious backstory like some of the vintage materials.
What makes them interesting is less about origin and more about aesthetics. The colour and pattern variations are deliberate but consistent, making it fairly easy to anticipate how they’ll look on a finished guitar. Unlike tortoiseshell, which can shift dramatically from manufacturer to manufacturer, pearloid maintains a stable palette. That said, the swirl direction, density, and shine can give each plate a little personality — no two are ever perfectly identical.
In short, if you’re after a classic, eye-catching pickguard with a bit of sparkle, pearloid is a solid, no-fuss choice that’s stood the test of time.

White Pearl
White Pearl is the most common pearloid you’ll encounter, and its look is instantly recognisable: subtle, shimmering, and classic. Fun fact — pearloid was originally designed as a faux “mother of pearl,” meant to mimic the iridescent inner layer of oyster shells. The result is a clean, elegant pickguard that catches the light in a way that flat colours just can’t match.

Aged White Pearl
Aged White Pearl is actually more common than you might expect. Think of it as the pearloid equivalent of Parchment — slightly warmer, with a subtle creamy tint. The “pearling” is a bit tighter than standard White Pearl, with fewer blank spots between the reflective areas, giving it a more consistent, refined shimmer. 
Grey Pearl
Grey Pearl isn’t my personal favourite. It started appearing a few years ago and was often misrepresented as “Black Pearl” in photos and marketing, but in reality, it’s nowhere near that dark. The grey tone gives a muted, subtle look, but it lacks the contrast and depth that makes other pearloids so appealing.

Avalon
Avalon is a relatively new pearloid pattern, and it gets much closer to the “mother of pearl” aesthetic that the original pearloids were trying to emulate. Instead of being broken into small reflective squares, the pattern flows with swirls and blotches, giving it a crisp, natural finish that really catches the light.

Abalone
If Avalon leans toward a mother-of-pearl look, Abalone is its more exotic counterpart, inspired by the iridescent inside of certain marine snail shells. The pattern is strikingly unique, favoring flowing swirls over the blocky reflective squares, giving it a vivid, eye-catching appearance.

Black Pearl
Black Pearl is always a bit contentious—it's not truly black, more of a dark grey. There is a slightly deeper version known as "Moto Pearl" (though tracking it down is another story), but both shades have their uses depending on the aesthetic you’re after.
Pearloid Quirks
Pearloid plates do have a few quirks of their own. While the material is relatively consistent, the way the “pearl” swirls are distributed can vary a lot from sheet to sheet. You might find sections with tight, dense pearling or areas that are more open and sparse. This isn’t a defect—just the nature of how the pattern is formed.
Additionally, colors can shift slightly depending on lighting and viewing angle, so a plate that looks crisp under one light may appear softer or more muted under another. It’s worth keeping this in mind when matching to existing finishes or other pickguards.

Shade Differences
When viewed on their own, pearloid plates can be tricky to compare, as the swirling patterns and reflections tend to dominate the eye. This is why side-by-side comparisons are so useful.
A good example shows Black Pearl and Grey Pearl next to each other, alongside Aged White Pearl and standard White Pearl. In this arrangement, the subtle differences in base color, contrast, and reflectivity become much clearer, helping you make a more informed choice.

Knobs
Pearloid pickguards present a unique challenge when it comes to matching knobs, tips, and covers, simply because the base color isn’t uniform. Here’s a practical approach:
-
Aged White Pearl pairs best with Parchment-colored plastics.
-
White Pearl and Avalon work well with standard White plastics.
-
Black Pearl doesn’t match true black knobs perfectly. In fact, it highlights the fact that Black Pearl isn’t genuinely black—but it’s about as close as you’re going to get.

3 and 4 Ply
Pearloid pickguards can be a bit confusing when it comes to ply count, because they don’t always follow the standard dark/light/dark pattern we’ve come to expect.
Essentially, the pearloid layer on the front of the plate counts as a ply. This means:
-
3-ply pearloid plates can appear as just 2 plys, especially on lighter pearls where the pearloid layer is semi-transparent and looks white.
-
4-ply pearloid plates often appear as 3 plys.
In this photo, you can just make out the individual plys and how they layer together.
Tortoise Shells
You’ve probably noticed that we do a huge variety of tortoise shell pickguards – and even then, we barely scratch the surface of the available styles.
Originally, tortoise shell pickguards were made from actual tortoise shell – pieces carefully shaped, joined, and polished until semi-transparent. Some of the earliest acoustic pickguards were made this way. Of course, nobody wants to go back to that practice, but people loved the look. When plastics came along in the early 20th century, they offered a much cheaper and more practical alternative. (Trade in hawksbill turtle shells didn’t become illegal until the 1970s.)
The first plastic tortoise shells were made from celluloid. It’s semi-transparent, with a kind of leopard-skin effect, and it looked gorgeous. Celluloid made its way onto guitars, mostly acoustics, and eventually electrics by the late ’50s and early ’60s. The problem? Celluloid is extremely flammable. Cutting it generates heat, storage is risky, and it’s generally unstable – prone to warping, shrinking, and colour changes under sunlight.
Today, tortoise shells are mostly made from Polyoxymethylene (more stable, but still flammable) or PVC (extremely durable, though it gives off toxic fumes if burned).
For modern pickguards, we typically work with five main variants (ignoring the rare, historical celluloid options). While celluloid still exists and looks incredible for historical accuracy, it’s extremely expensive, difficult to source, and high risk to work with. As a rough guide, sourcing a single celluloid plate could cost upwards of £150.
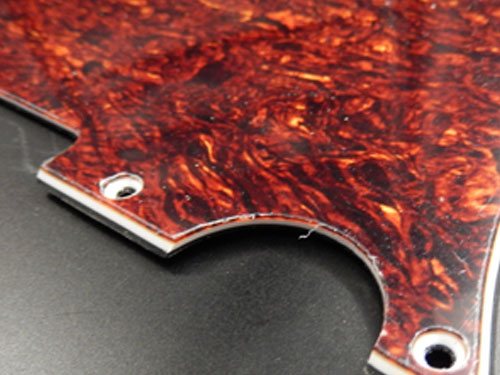
Classic
This is a funny one. For the longest time, it was the only tortoise shell we had access to, and honestly – it’s fine. You see it fairly often on mid-priced guitars like the Squier® Classic Vibe and Vintage Modified lines.
Personally, I think of it as a “cheat” tortoise shell, because it appears to be a screen print sandwiched between layers of PVC. That gives it a slightly flat look, but it’s very uniform. So, if consistency is your goal and you want all your tortoise shells to look the same, Classic is the way to go.
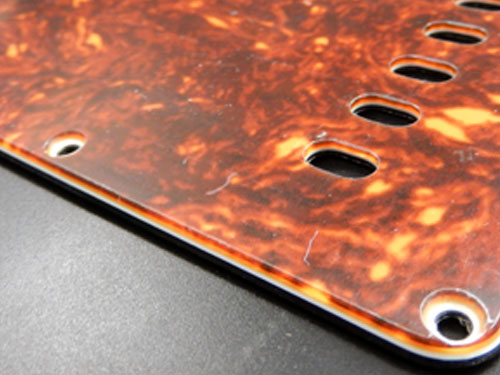
3 Ply Brown
Now we’re talking. Unlike the “flat layer” version, 3 Ply Brown is the real deal – multiple semi-transparent PVC layers (usually one yellow, one brown) overlaid to create that classic tortoise shell effect.
For whatever reason, the 3-ply version tends to show a little more yellow in the mix than the 4-ply, giving it extra depth and richness. If pressed, I’d say it’s my favourite of the tortoise shells.
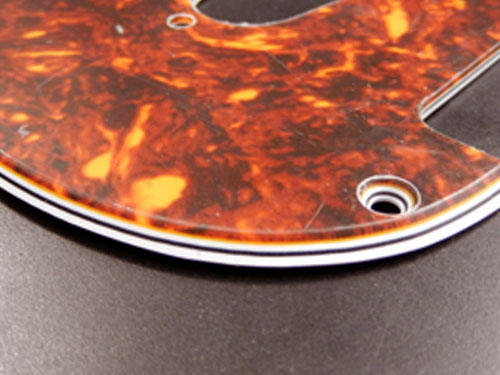
4 Ply Brown
Slightly darker than the 3-ply version, the 4-ply shows less yellow bleed-through in the mix—presumably because the yellow layer is thinner. The overall effect is a richer, more subdued tortoise shell look, while still retaining that classic depth.
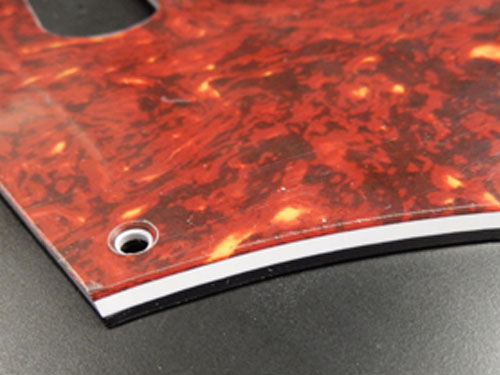
3 Ply Red
Much like the 3-ply brown, this version layers yellow and red PVC, one on top of the other. The principle is the same, but the result is a more vibrant, warmer tortoise shell, giving a slightly livelier appearance on the pickguard.
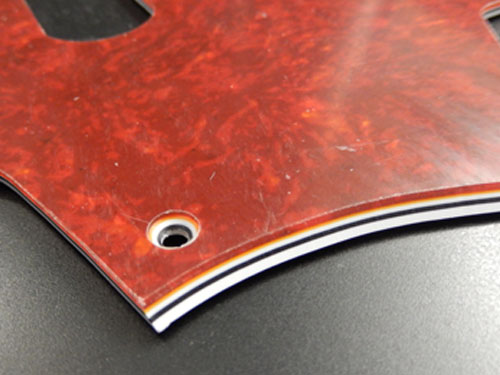
4 Ply Red
In the 4-ply red, the yellow layer is largely removed, leaving a deep, rich red that almost approaches a red pearloid. It’s clean, vibrant, and avoids the subtle yellow tinge you see in the 3-ply version — perfect if you want a striking, uniform red tortoise effect.

Celluloid
For completeness, here’s a look at a celluloid plate. It’s absolutely gorgeous, with incredible depth to the “shell” effect that PVC can’t quite replicate. That said, if you look closely, you’ll notice this Jazzmaster plate has warped significantly. It’s been stored under the same conditions as the PVC plates, but celluloid simply doesn’t age as well — beautiful, but far less stable.
A Quick Note on Returns for These Plates
These plates are made to order, based entirely on the specifications you choose—pot hole positioning, pickup routing, and any other tweaks. Because of this, they’re classed as custom work and fall under the relevant section of our Terms & Conditions.
Once we’ve made a plate to your chosen spec, it becomes non-returnable, non-cancellable and non-refundable. Even if the product page shows a “standard” configuration, that’s just a starting point—every plate is individually built to your selections.
Before hitting “buy,” please double-check that everything is exactly how you want it. We’ve made it as easy as possible to be confident in your order:
We want you to feel confident in your order—and we’re here to help if you have any questions.
Once it’s made, it’s yours: no returns, no refunds.
FAQs
Will this pickguard fit <INSERT GUITAR MODEL HERE>?
Alright, I’ve typed this out in emails tens of thousands of times, and honestly? The answer is still the same:
“I DON’T KNOW.”
No one really does—not with total, unwavering certainty. And here’s why:
1. The sheer variety of guitars
I (and any guitar tech, shop employee, or parts specialist) see a tiny cross-section of guitars each year. There are models I’ve never seen in the flesh, let alone held in my hands for a pickguard swap. Some makes and models won’t even come onto my radar until an email or call mentions them.
There’s no “Haynes manual” for pickguards. Even Fender® doesn’t publish a spec sheet for every Strat®, Tele®, or Les Paul®. Knowledge here is largely a hive mind thing—shared between techs, enthusiasts, and shop staff. I generally only know if a pickguard fits when someone tells me it worked (or didn’t). Feedback is everything.
2. Pickguards aren’t truly standardized
It’s a common assumption, but not entirely true. There are recognized specs—take Stratocasters®, for example: 1954–57, 1958–62, and 1963 onward. Mounting screw positions remain consistent in those ranges.
But even within those ranges, guitars can be slightly “off.” A hole might move 2 mm, a tremolo cavity might be 1 mm smaller, or a humbucker route could shift 5–6 mm. Sometimes these changes are factory experiments, sometimes they’re just quirks. By the next production run, everything might snap back to the standard.
So yes—a pickguard that fits one guitar of the same model may not fit another produced a week later.
What’s the best advice for checking fit?
-
Measure it yourself.
Click the Technical Specification tab for diagrams. Measure centre-to-centre on holes, edge-to-edge on the shortest sides, and allow a small tolerance for measurement error. It’s a two-minute job.
-
What if it fits physically, but screw holes don’t line up?
This happens more often than you think. Most aftermarket pickguards assume the “official” spec. If your guitar is out-of-spec, the screw holes might not match.
Options:
Option 1 – Modify your guitar:
Fill and redrill mounting holes (Epoxy works well), adjust routing if needed. Easy, tidy, and future pickguard swaps remain simple. Could technically reduce resale value, but practically? Rarely a problem.
Option 2 – Custom pickguards:
These do exist. A sheet of plastic is cut to match your individual guitar. They’re labor-intensive, expensive, and have a high failure rate. Expect a £100–200 job. Don’t fall for anyone offering to do it for £30—it’s not realistic.
“I’ve received my pickguard and it’s VERY scratched.”
Chances are, what you’re seeing isn’t actually scratches on the pickguard itself—it’s the protective plastic film applied to the surface during manufacturing and shipping.
This thin sheet is designed to shield your pickguard from scuffs, scratches, and dust while it’s being made, packed,
and shipped. It’s completely normal for this film to look a bit worn or scratched—the good news is, that means the pickguard underneath is still pristine.
What to do: Carefully peel off the protective film before installing your pickguard. You’ll reveal the flawless, shiny surface underneath.
If you do spot any marks after removing the film, please get in touch—we want to make sure every pickguard leaves here looking perfect.
|
Bridge Pickup
|
Middle Pickup
|
Neck Pickup
|
Electronics
|
|
|
|
|
|
Mounting and Ply Options
|
Mounting Screw Pattern
|
Ply Colour and Extra Options
|
Orientation
|
|
|
|
Please note - with the Tortoise Shell plates, 3 ply will show a little more "yellow" in the mix then the 4 ply versions,
The same with Black Pearl - the 3 ply version is lighter then the 4 ply version.
|
|
Truss Rod Access
|
|
|
|
|
|
|
|
 |
|
 |
|