 |
 |
 |
|
Main Description
What is an Assembly?
This is something I’ve been a little lax with over the years, because the photos were a little self explanatory, but because we’re putting out more and more information on the products nowadays, it’s a nice opportunity to actually explain what an assembly is.
In short, its all of the electronics, all wired up and working, mounted onto a pickguard, and ready to drop into a guitar. It’s a VERY easy way to completely overhaul your guitar, without having to do an awful lot of soldering, or, frankly, really understanding what’s going on.
Now, with our assemblies, we cut no corners. Its CTS pots throughout, 3 way Oak Grigsby switch, Cornell Dubilier caps,22 AWG cloth covered wire and a Switchcraft mono socket.
We don’t connect the mono socket to the assemblies, but this is because on 99% of guitars, you’d only have to remove it to thread the wires through a hole into the sockets cavity, and, we obviously cant connect the ground wire to your bridge/trem claw to earth the strings.
so, whilst no completely solder free, what soldering you do need to do, is pretty minimal (and we’ll even throw in a little solder and heat shrink to do the job – purely to save you any extra expense)
You will need a soldering iron I’m afraid, that’s unavoidable, because of the way most guitars are designed, but beyond that? It’s a dream job installing assemblies frankly. Very little to go wrong, very little to actually learn, and it opens the door to making a huge modification to your instrument.
No Pickups?
I cant stress this enough - No pickups are supplied with this loaded plate.
I'm aware its a little confusing because the swatch images show poles in the covers (which ARE supplied), so it "looks" like there are pickups, but that is purely to make everything look normal. To repeat myself - NO PICKUPS ARE SUPPLIED.
As much as i'd love everyone to buy into what we do at Axesrus, and go for our pickups, I understand entirely, that you might want to go in a different direction on that front, and its not really my style to hold anyone to ransom over their pickup choices - you can still have an Axesrus wiring setup without Axesrus pickups (in most cases, atleast. There are a few exceptions, such as the Craggy Mod setup - not that i'm overly protective over the circuit (its fairly simple!), but its a little too specialist to support as a "DIY" project (which i'll come back round to)
The entire purpose of this product, is for you to install whatever pickups you choose - reap the benefits of CTS pots, Oak Grigsby switches, switchcraft monos, absolutely rock solid soldering, and a fantastically relaxed warrenty - but, ultimately, use whatever pickups you like!
This does, however, put Axesrus in a potentially sticky situation, because these looms will only function once the pickups are added, and that means they must be installed correctly! Ensuring that you install pickups correctly, is not the responsibility of Axesrus (UNLESS, Axesrus has supplied the pickups)
The "problem" with this, is (unfortuantely) your pickup manufacturer may have a similar stance (although, honestly, its unlikely, due to the nature of their product), but, there is some logic to our position in this.
With pickps, there are countless variables that alter how they function. Some have specialist requirements on pot and cap values, some require power, some simply aren't designed to work on 5 way switches in a way your expecting... theres alot, and, sadly, i cant know what pickups you've got, or what they're expecting from the wiring loom if we've not supplied them. Even to the point where i wont know the colour codes on the wiring.
So, go in eyes open - these loaded plates are great, but they do presume a little extra knowledge then a "fully loaded/with pickups" assembly.
As a general rule - you'll spot pretty quickly if theres a fault with the loom (which is, essentially, what this comes down to) rather then a fault with the pickup install. Pickups behaving "weird" (thinner sounding in certain positions, quieter, not working what so ever) is, usually, a fault with the pickup side of things. Anything "in all positions", (so, crackling pots, noisy switch, intermitent signal) will be the loom - its not a hard and fast rule, but, it'll usually get you speaking to the right person. We can help with the loom, but we cant do much about the pickup install i'm afraid.
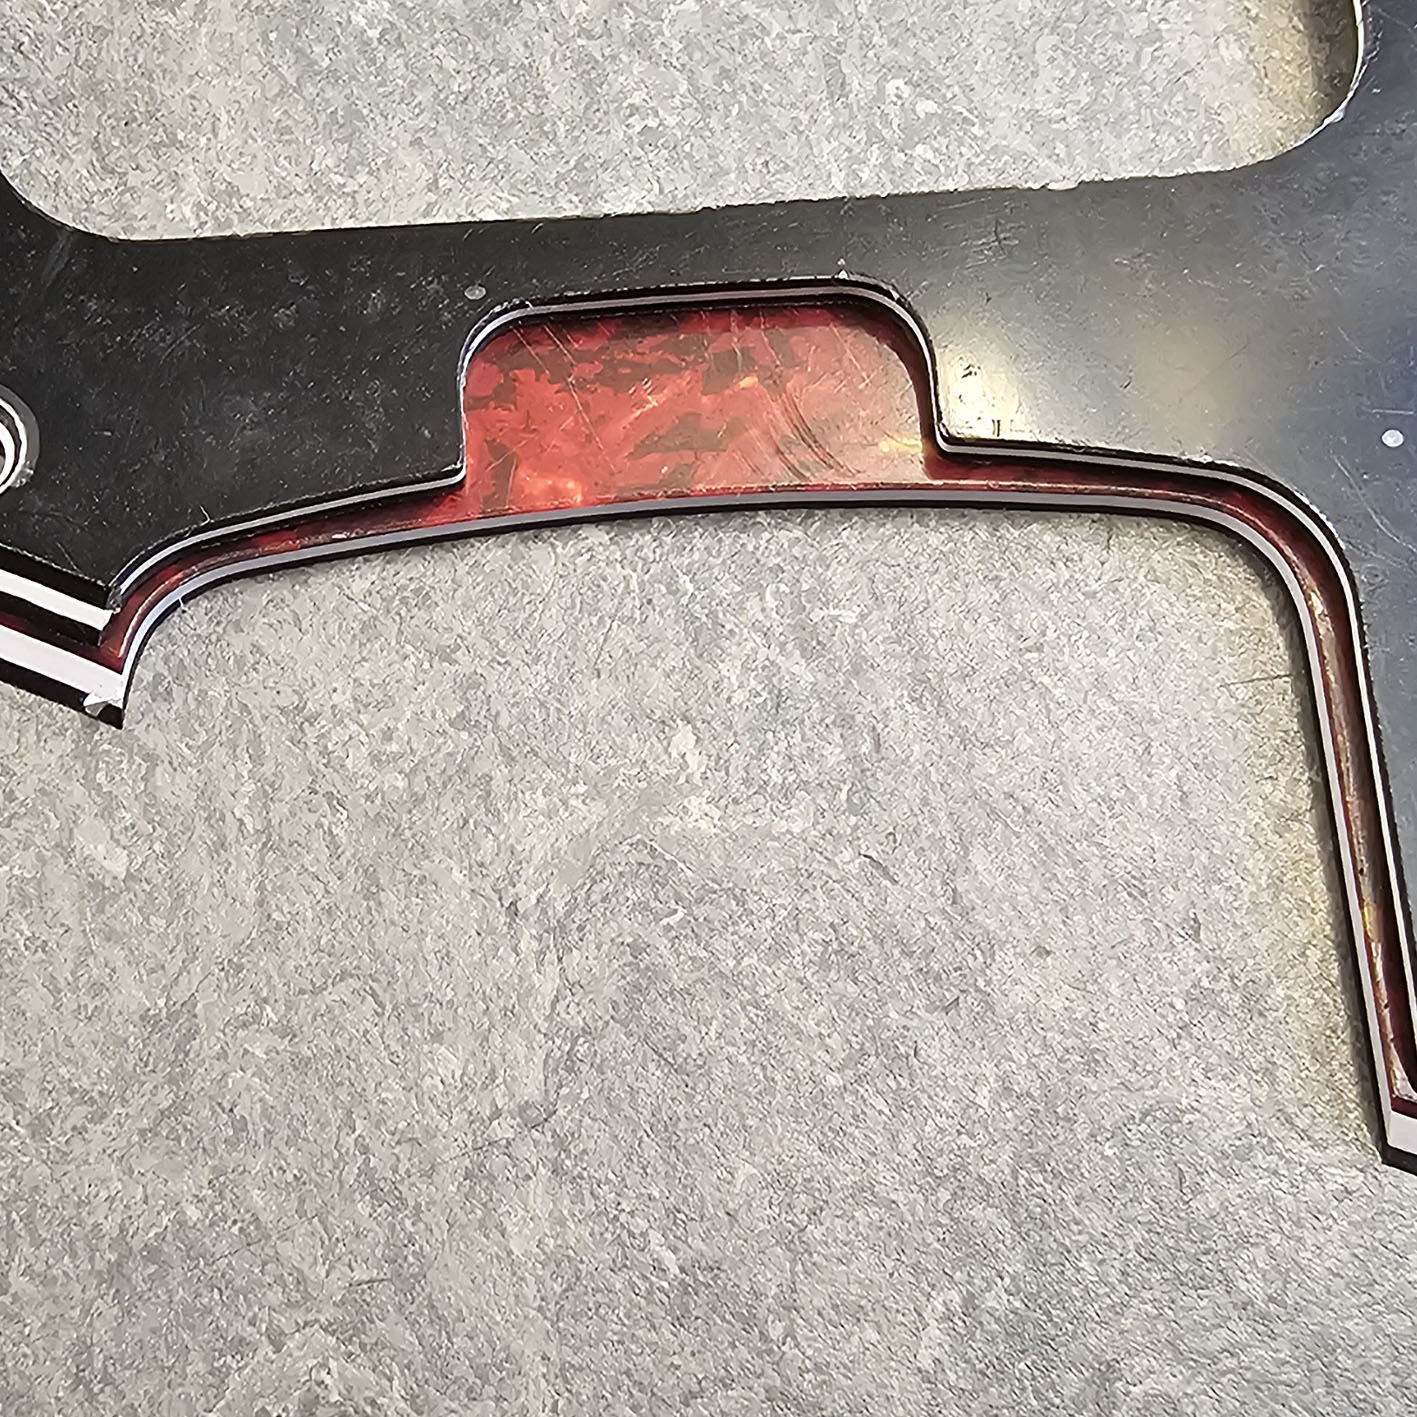
Truss Routing
Probably the thing i love the most about Charvel® gutiars - that wheel adjustment on the heel of the neck. Nothing too strange to be honest, but worth noting that the pickguards are routed to accomodate the "wheel". You can see too, that the actual neck pocket is slightly wider on the Charvel® too.
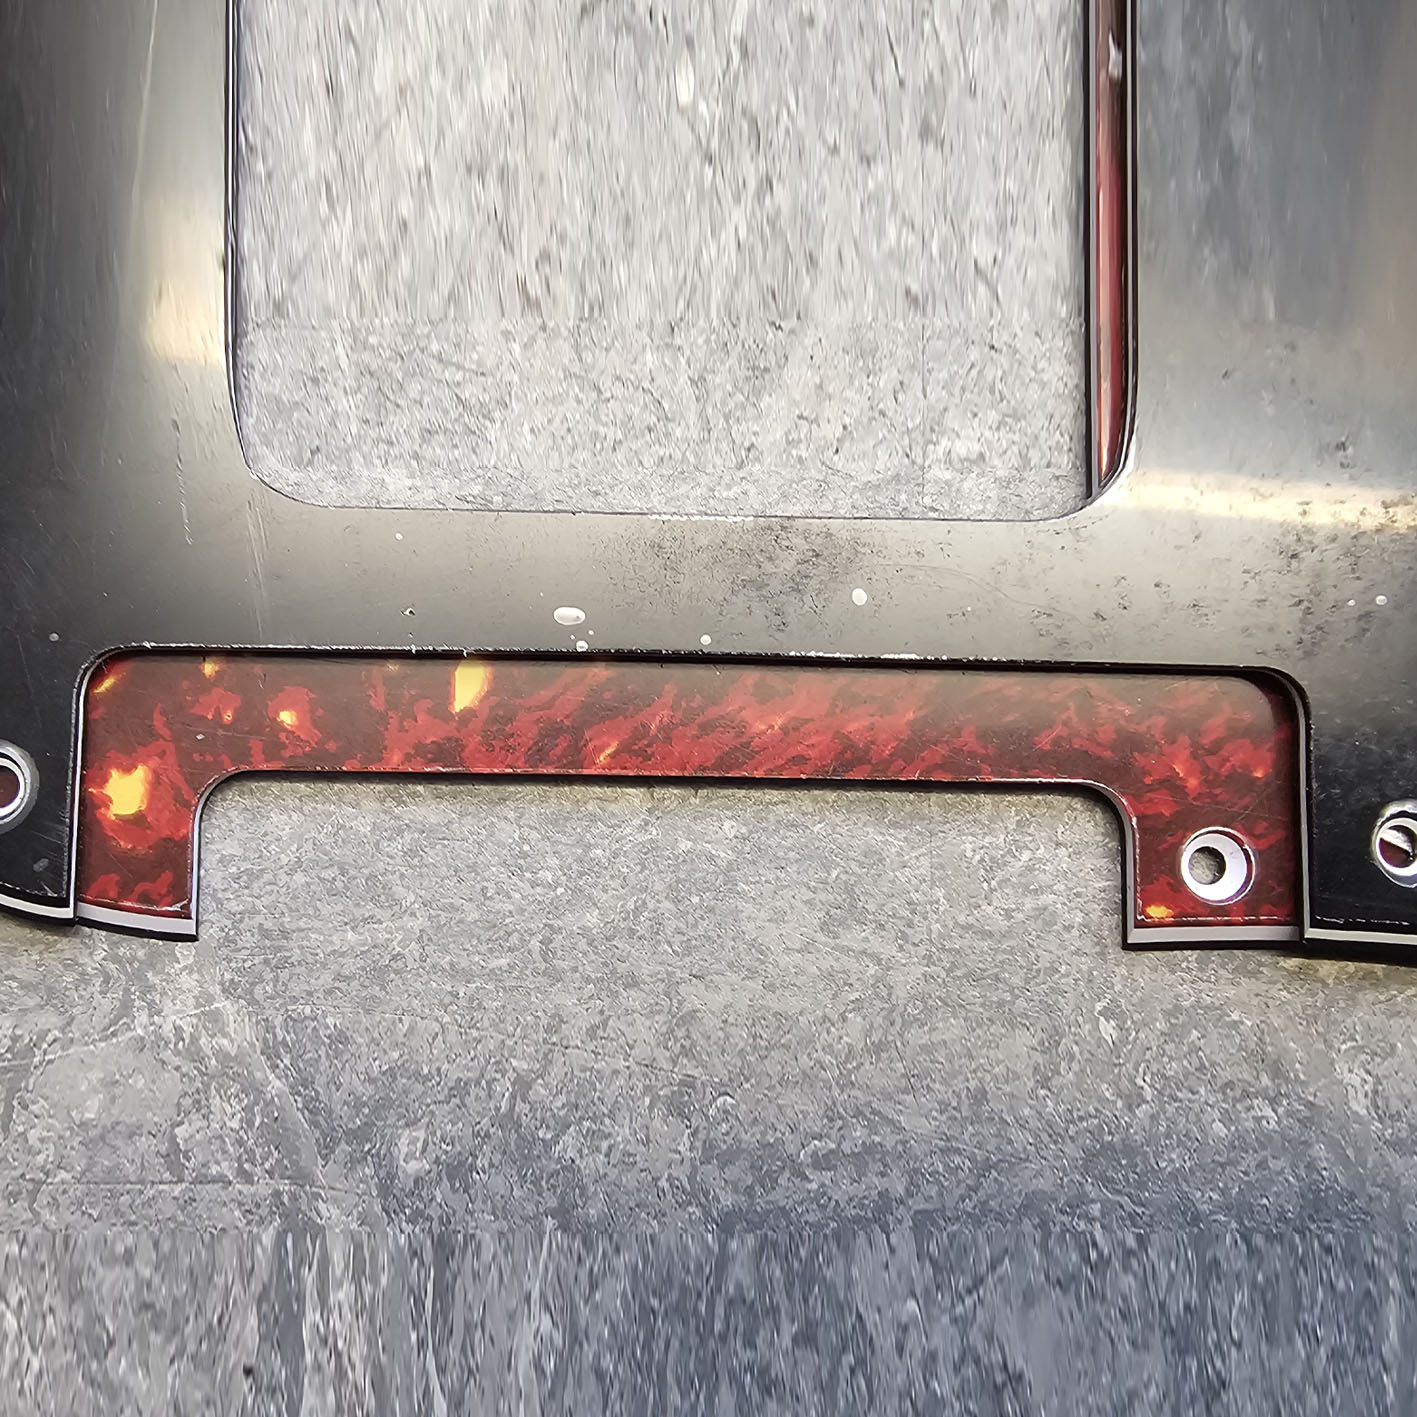
Locking Tremolos
Once upon a time, when the patent was locked up tighter then the tuning they offered, these would have been called "Floyd Rose Tremolo" pickguards - but in recent years, the waters have become a little more muddied - so, the industry has become a little more "catch all" in its naming convensions.
However, that does breed a little confusion too, so, for clarities sake, when we speak about "Locking Tremolos"? We're speaking about Floyd rose Trems, Gotoh GE1996s, Ibanez Edges. Basically, any trem thats taken that original FR blueprint, and ran with it. Normally, they'll have a "top plate" thats 91mm wide, and is desigend to fit into 2 posts, that are 74mm spaced.
Either way, much bigger then a Standard Fender Trem route.
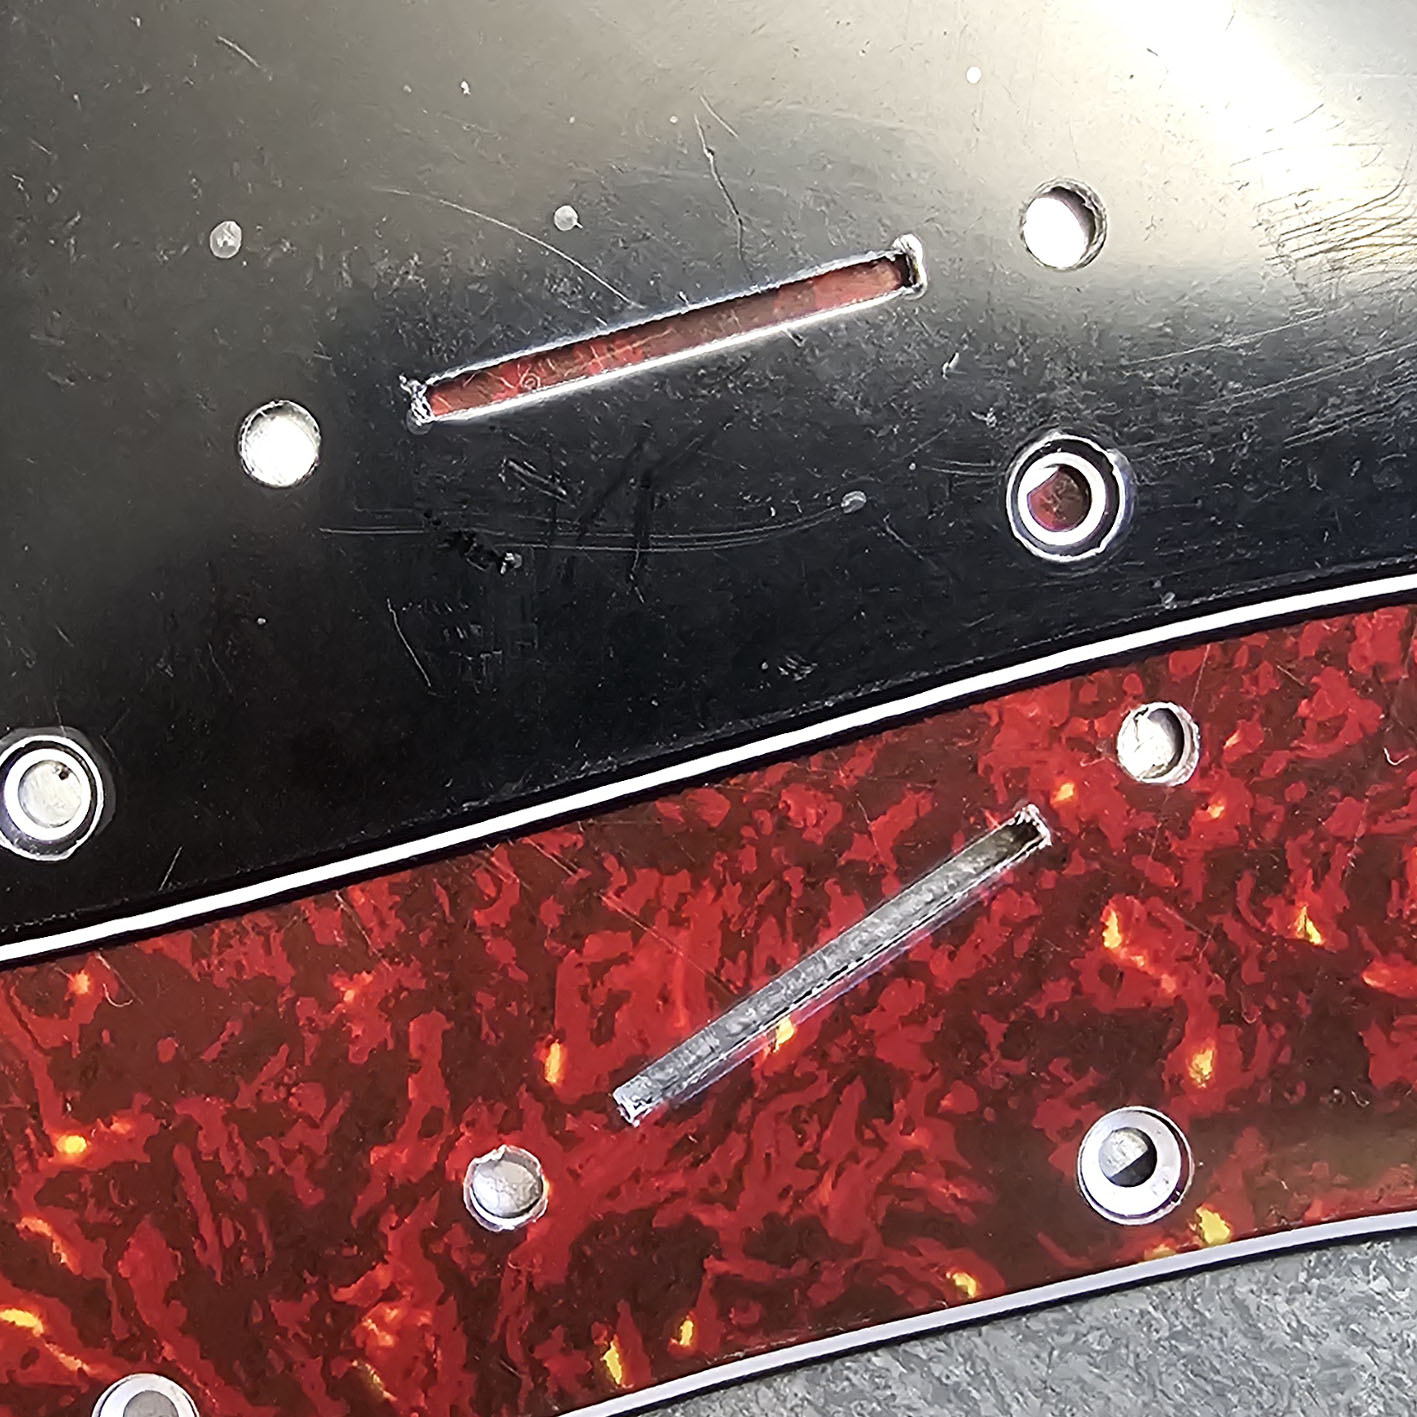
Switch
I mentioned this in the main write up, but, this ones easily missed - the So-cal style 1 (for the most part!) has a shallower angle on the switches travel. It gets the switch tip slightly more "out of the way" and helps protect it from being knocked "into bridge" when strumming.
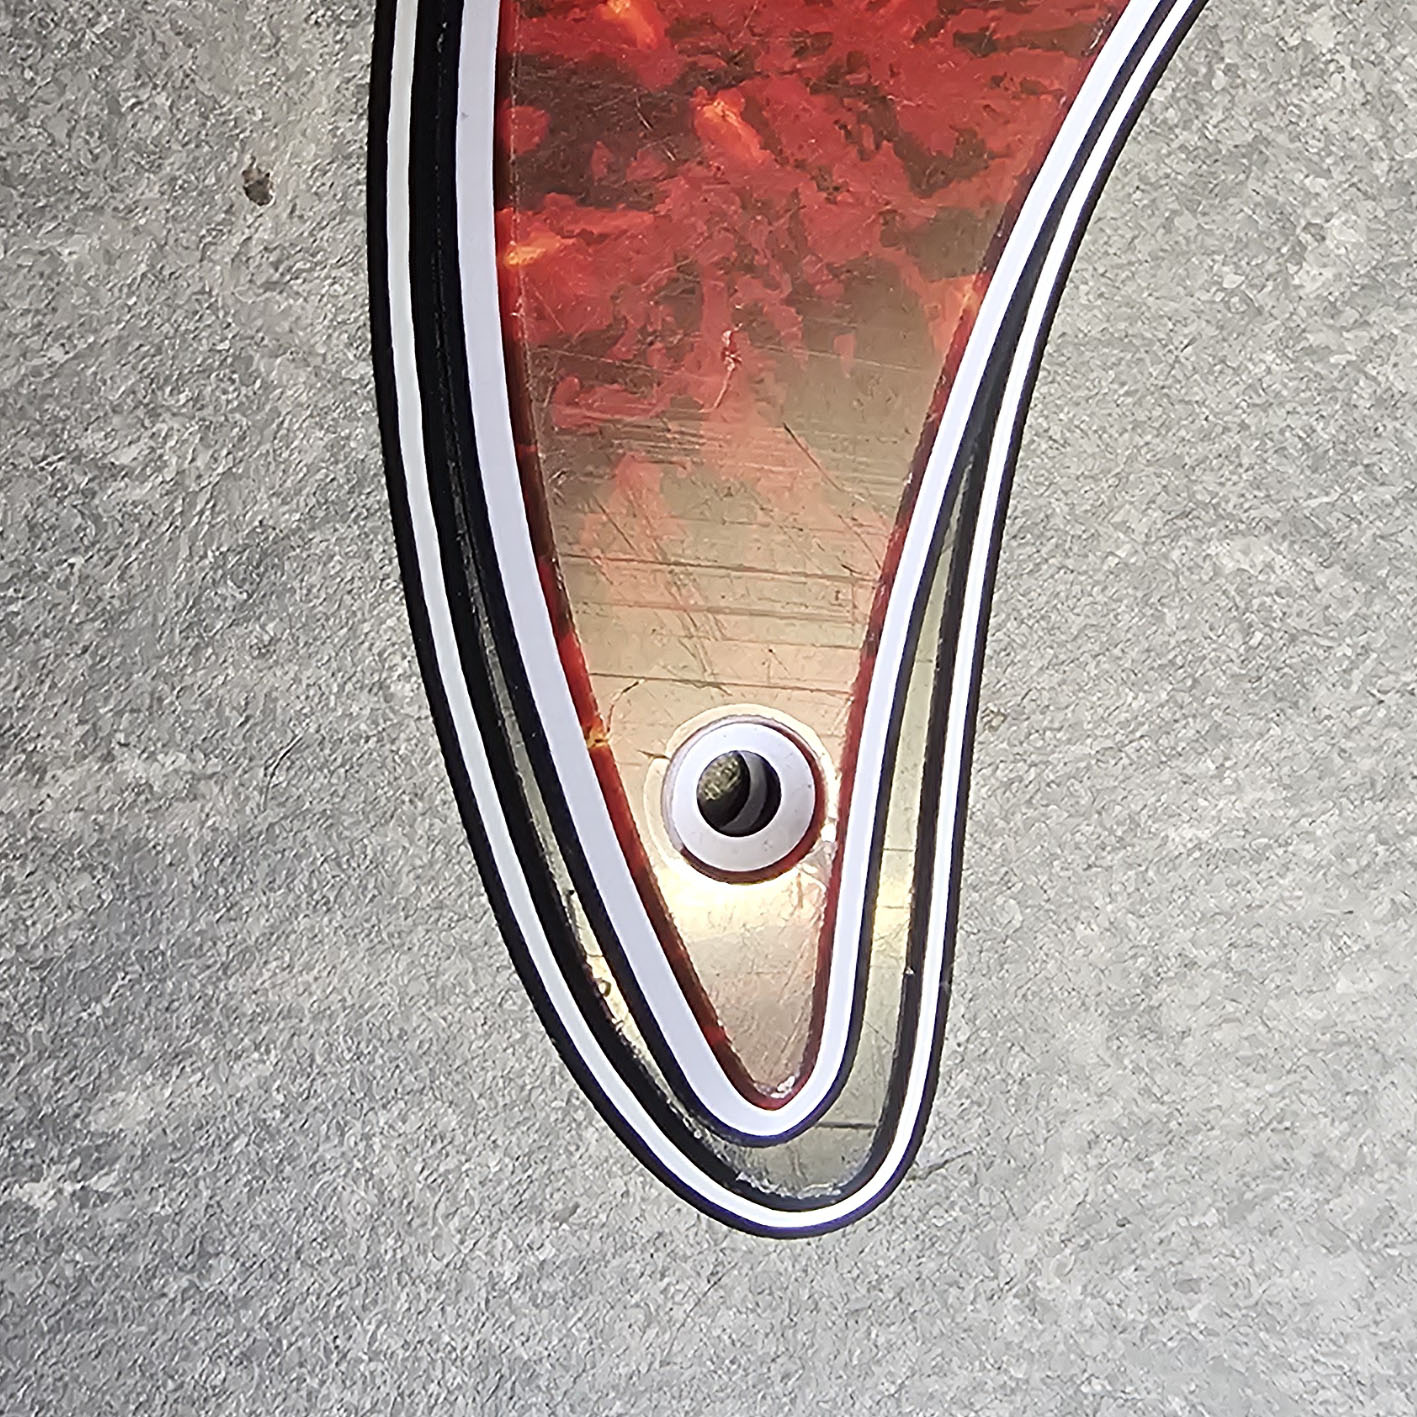
Lower Horn
I think, this is the thing i really like about the So-Cal 1s - the lower horn is much more rounded then on a Stratocaster. Its a very small difference, but having the plate follow the contours of the body, is a really nice touch.
Interestingly, you can actually see this turn up on a few other "Super Strats that aren't Super Strats" that appear under the FMIC umberellla - Jackson® use the same idea on their So-Cals (SCs!) and, even on a few of the San Dimas models (But not all, some use "Strat®" Plates)
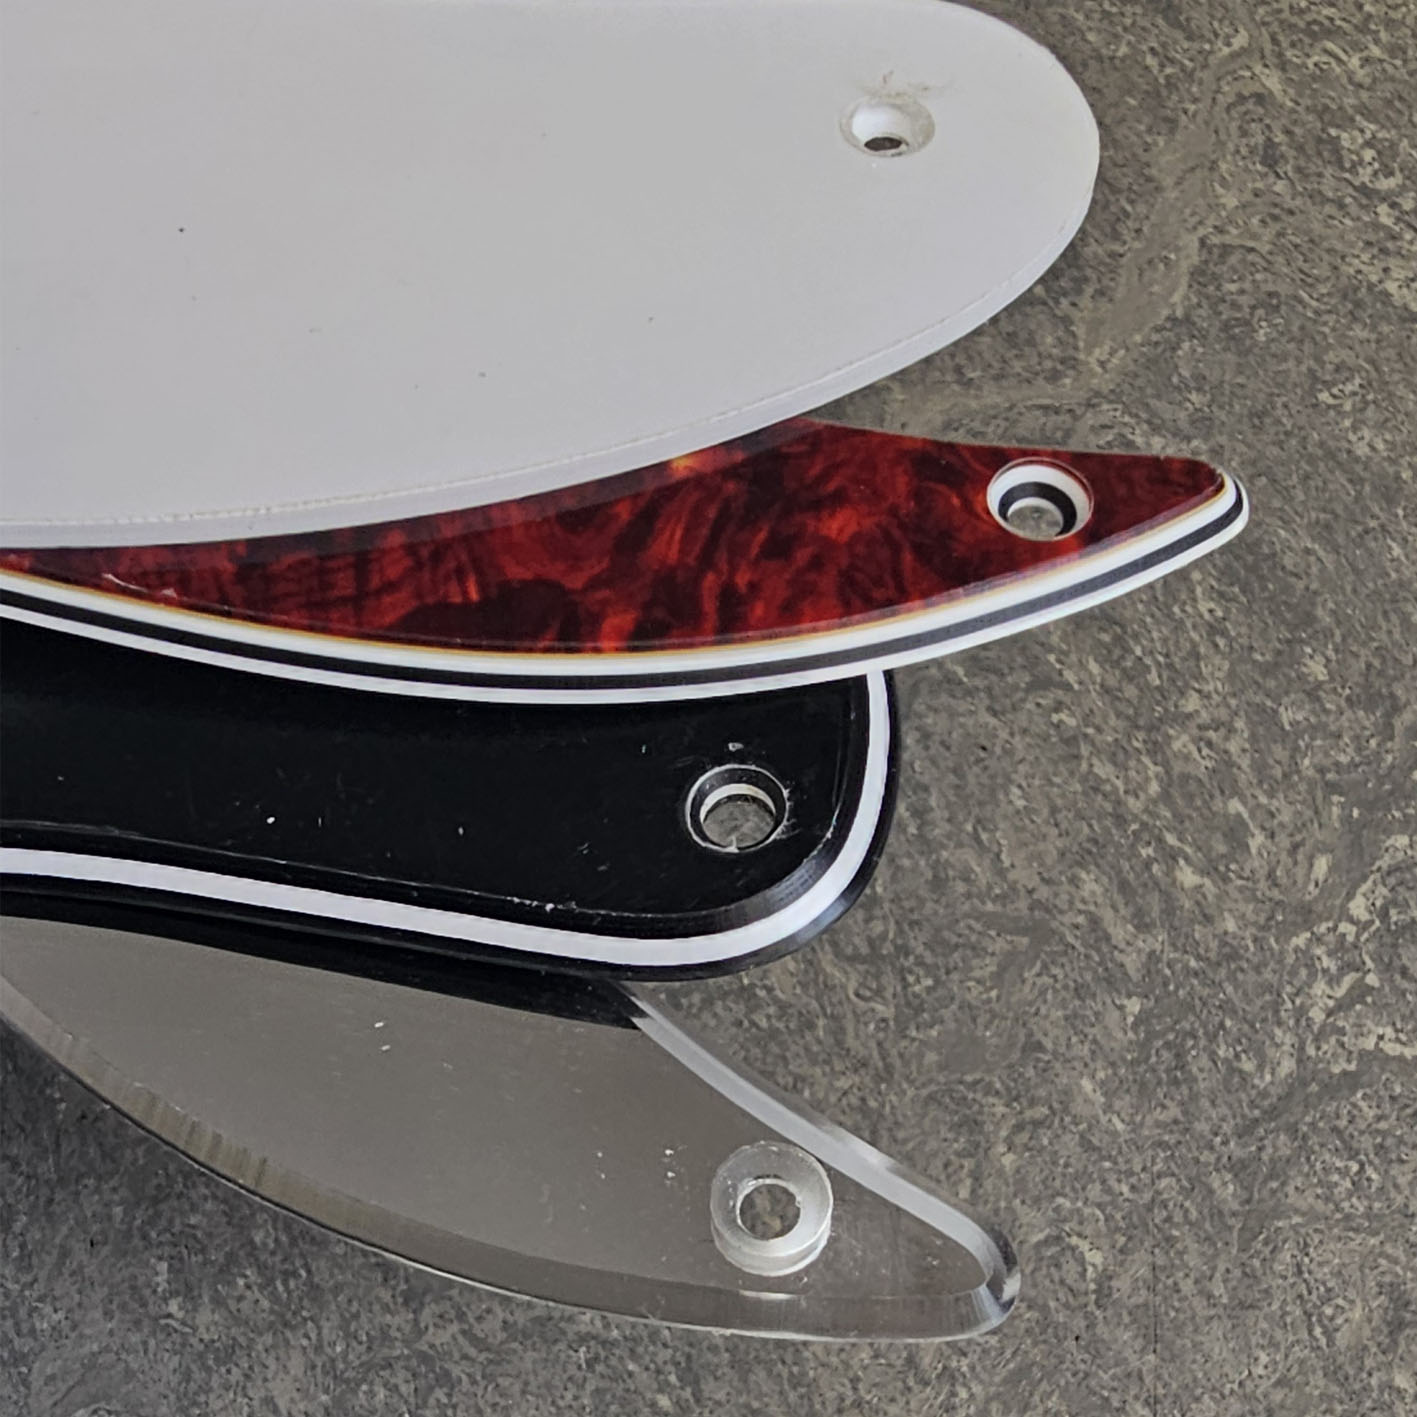
Edges
Much the same as every other pickguard really - 1 ply plates are flat edged, 3 and 4 plates are 45 degree bevels. The only exceptions are the mirror finished plates, that are 1ply, but with a 45 degree edge. (Except in the neck pocket and the bridge route)
Fender®, Charvel®, Stratocaster®, Strat®, So-Cal® are registered trademarks of Fender Musical Instruments Corporation and Axesrus® has no affiliation with FMIC
A few years back, we changed how we approached pickguards. For a while, we ran a full “custom pickguard” service — and to be honest, it was a headache from start to finish. Interestingly, the most common requests weren’t for wild custom shapes — just standard plates with slightly different control layouts.
So, when the full custom work wound down, we took a more practical approach: we started stocking “half-finished” pickguards — fully cut and finished, but without the control pot holes drilled. This allows us to offer a wide range of pickup and control options, drilling the holes in-house to your spec. It’s quick, simple, and keeps costs down — no need for a full custom build.
What’s Custom, and What Isn’t?
Let’s be clear — this isn’t a full-blown custom shop service. We’re not cutting new shapes, routing entirely new cavities, or making major structural changes.
Instead, we’re simply drilling different control layouts using jigs and a pillar drill. While that technically makes these pickguards “custom” (since they’re made to order), the scope is intentionally limited.
You’re choosing a pre-made plate — often something like a covered or uncovered HH layout — and we’re customising the pot holes, and occasionally routing a pickup if needed.
Any Extra Costs?
You Can Have Three Hole Sizes Drilled
We offer three sizes of holes, depending on your needs:
-
10 mm – for standard pots
-
½" – for full-size toggle switches
-
¼" – for mini toggle switches
The positions stay the same; only the diameters change depending on what you’re adding.
So — with all that in mind — let’s walk through how to understand where the holes go and how to get the layout you want.
This is, probably, easier with a diagram, but, be warned, whilst it makes sense - its pretty cluttered.

Diagram Key
-
10 mm Pot Holes: White
-
¼" Mini Switch Holes: Pink
-
½" Toggle Switch Holes: Grey
-
UFO Knobs (~1" diameter) and Switch Tips (9 mm over the slot): Green
The system is smart enough to prevent most overlap issues, but some combinations sneak through. For example, fitting a 10 mm pot in the Offset 2 position alongside any switch will get really tight once the knob is installed.
Pickups
Choose from a range of pickup styles to suit your build.
Humbuckers
The HB Strat® pickguards are so common these days that most players don’t even think of them as a “mod” anymore. Still, it’s worth approaching humbucker routes with the mindset that this isn’t the standard setup—mainly because there are a few variations that can catch you out.
By default, we offer the bridge position routed for either an Uncovered or Covered humbucker, included at no extra cost.
Prefer a 3-screw mount humbucker? We can do that too. This option requires routing the pickguard to order, which involves extra work and carries a small additional charge.

Uncovered Humbucker
This is what I’d call the “standard” humbucker option for a Stratocaster®. Technically, it’s not truly standard—Fender® usually use a 3-screw mount humbucker—but most aftermarket pickups aren’t built that way, so this layout has become the norm.
The pickup route has rounded corners that follow the shape of the bobbins, giving a clean and intentional look.
It’s cut slightly oversized to protect the coils and ensure compatibility with:
-
Standard uncovered humbuckers
-
49.2mm, 50mm, and 52mm spaced pickups
-
Trembucker® models (which are slightly larger again)

Covered Humbucker
Covered humbuckers aren’t actually that common on the Stratocaster®. Maybe it’s the odd mix of a metal-covered pickup next to plastic single coils—but for whatever reason, most aftermarket plates default to a covered bridge route.
The covered route is cut tight to the pickup cover, leaving no gaps or wiggle room. Since covered humbuckers are slightly larger than uncovered ones, the sizing of this route is specific to them.
This is a humbucker-only route—you won’t be able to fit a covered Trembucker® here (though those are rare anyway, since they don’t suit many guitars).

3-Screw Mount
I’ve always loved the Fender® 3-screw mount humbucker. It’s rock solid, looks great, and gives you far more control over the pickup angle than the usual 2-screw mount. In my opinion, it’s simply a better design.
The downside is that it’s almost exclusive to Fender® pickups—or anyone using our conversion plates.
The route itself is much like the uncovered humbucker cavity: slightly oversized, with rounded corners to match the bobbins. The key difference is the two screw holes on the bass side instead of one, which set it apart from the more common layout.
Since this has to be routed to order, there’s a small extra charge. But if you’re into Fender’s system, it’s absolutely worth it.

MisMatch
It’s actually pretty common—especially on non-Fender® guitars—to mismatch humbuckers and routes. You can usually get away with it, but there are a few rules of thumb worth knowing:
-
Uncovered humbuckers will fit into covered routes. They’ll work fine, though you’ll see a small gap around the pickup.
-
Fender® 3-screw mount humbuckers fit into both uncovered and covered routes, since they still retain the central mounting hole.
-
Covered humbuckers will not fit into uncovered or 3-screw mount routes—the route simply isn’t wide enough.
When in doubt, a covered route is the most universal option.
.
Colours
Ok, even I’ll concede this isn’t the most thrilling topic at this stage — but there’s a surprising amount of confusion around the various “off-white” pickguard colours. And seeing as we’re already ticking off pearls and tortoise shell variants, we might as well tackle the parchments, mints and creams too.
So, let’s get stuck in.

White
All our white plates use this exact shade — a fully opaque pigment with no translucency or ageing tint. It’s exactly what most people picture when they think “white pickguard”: clean, crisp, and pristine.
It doesn’t try to mimic vintage plastics or look “aged in,” so if you’re after a bright factory-fresh look — or you’re pairing it with bold or modern colours — this is the one.

Parchment
Sometimes sold as “aged white,” parchment sits one step in from pure white. It’s a touch darker, with a hint of cream or yellow in the mix — think along the lines of old newspaper or paper that’s had a few decades to mellow.
It’s a great middle ground if you don’t want the starkness of bright white, but you’re not ready to dive into full-on cream or mint territory.

Mint A
The lighter of the two mint shades. It’s not actually all that common on production guitars, which surprises a lot of people, because this is the tone most folks picture when they think “mint green.” It’s subtle, soft, and only just tinted — enough to take the edge off white without straying into cream.

Mint B
The “proper” mint green. Darker than Mint A, with a subtle grey undertone that gives it depth. Be warned — it does not photograph well and will often be corrected by cameras into something lighter or more vibrant than it actually is. In real life, it’s a rich, deep green, much closer to the discoloured nitrate plastics of the 1960s, which this colour originally sought to replicate.

Ivory
Ivory — sometimes called “Creme,” particularly in Gibson parlance — is a warm, buttery shade with a hint of orange. It’s not commonly seen on Fender-style pickguards, which makes it a bit special, but personally, I absolutely love the richness it brings to a build.

Black
Black is, well… black. There’s not a huge amount to say about it — it’s opaque, crisp, and very classy. I particularly like the contrast it creates on 3-ply pickguards with a white middle layer; it just works.
Mint Green Notes
Before we dive any deeper into colours, a few things are worth flagging about Mint Green — it’s a tricky shade and often comes across completely differently in photos.
First, if you’ve looked at the “real” photos of Mint A and Mint B, you’ve probably noticed they look almost identical. That’s not a mistake — cameras genuinely struggle to capture the subtle differences. They tend to auto-correct everything toward a washed-out Mint A, regardless of the actual plate.
So, why bother showing photos at all? Well, the unedited images highlight how misleading camera shots can be. From here, you have to trust the edited examples above, or the colour swatch in the pickguard customiser — that’s a very accurate representation of what the plates look like in real life.
The takeaway? Don’t rely on photos when judging Mint Green. If I’ve had this problem, so has everyone else. A quick search online will show you at least ten subtly different mint shades on Fender guitars — but in reality, Fender almost always used Mint B (with the exception of Fender Japan). Over the last 20 years, I’ve come across just four actual Mint Green shades: B, A, a very bright “snot” green, and a slightly lighter version of B that’s still pretty close.

Mint B
Unedited, Mint B looks nothing like this in real life. It’s a much darker green, with an almost greyish tint that gives it that classic, slightly aged 60s vibe.

Mint A
Mint A is actually quite close to this, though in real life it’s a bit more vibrant and not quite as “washed out” as the photo suggests.

Comparison
When Mint A and Mint B are photographed side by side, alongside a few other colours (in this case, White and Parchment), it provides a much clearer sense of the differences between the shades.

Ivory vs. Ivory/Black/Ivory
We actually carry two different Ivory plates. There is Ivory, available in a 3-ply Ivory/Ivory/Ivory version and a single-ply version, and we also have Ivory/Black/Ivory 3-ply, which is now obsolete but survives in old stock.
These are not the same colour. The Ivory/Black/Ivory plates will not match Ivory single-ply or Ivory/Ivory/Ivory plates. The I/B/I plates are closer to a nicotine yellow, whereas the I/I/I plates are much more of an orange “cream.”
Pearloids Explained
Pearloid pickguards are often lumped in with tortoiseshells, but they occupy their own, slightly shinier niche. They’re not as subtle as tortoiseshells — the swirls and patterns are more pronounced, with a pearlescent effect that catches the light beautifully. Historically, they’ve been a relatively straightforward affair: virtually all pearloid pickguards are made from PVC, and there isn’t a deep, mysterious backstory like some of the vintage materials.
What makes them interesting is less about origin and more about aesthetics. The colour and pattern variations are deliberate but consistent, making it fairly easy to anticipate how they’ll look on a finished guitar. Unlike tortoiseshell, which can shift dramatically from manufacturer to manufacturer, pearloid maintains a stable palette. That said, the swirl direction, density, and shine can give each plate a little personality — no two are ever perfectly identical.
In short, if you’re after a classic, eye-catching pickguard with a bit of sparkle, pearloid is a solid, no-fuss choice that’s stood the test of time.

White Pearl
White Pearl is the most common pearloid you’ll encounter, and its look is instantly recognisable: subtle, shimmering, and classic. Fun fact — pearloid was originally designed as a faux “mother of pearl,” meant to mimic the iridescent inner layer of oyster shells. The result is a clean, elegant pickguard that catches the light in a way that flat colours just can’t match.

Aged White Pearl
Aged White Pearl is actually more common than you might expect. Think of it as the pearloid equivalent of Parchment — slightly warmer, with a subtle creamy tint. The “pearling” is a bit tighter than standard White Pearl, with fewer blank spots between the reflective areas, giving it a more consistent, refined shimmer. 
Grey Pearl
Grey Pearl isn’t my personal favourite. It started appearing a few years ago and was often misrepresented as “Black Pearl” in photos and marketing, but in reality, it’s nowhere near that dark. The grey tone gives a muted, subtle look, but it lacks the contrast and depth that makes other pearloids so appealing.

Avalon
Avalon is a relatively new pearloid pattern, and it gets much closer to the “mother of pearl” aesthetic that the original pearloids were trying to emulate. Instead of being broken into small reflective squares, the pattern flows with swirls and blotches, giving it a crisp, natural finish that really catches the light.

Abalone
If Avalon leans toward a mother-of-pearl look, Abalone is its more exotic counterpart, inspired by the iridescent inside of certain marine snail shells. The pattern is strikingly unique, favoring flowing swirls over the blocky reflective squares, giving it a vivid, eye-catching appearance.

Black Pearl
Black Pearl is always a bit contentious—it's not truly black, more of a dark grey. There is a slightly deeper version known as "Moto Pearl" (though tracking it down is another story), but both shades have their uses depending on the aesthetic you’re after.
Pearloid Quirks
Pearloid plates do have a few quirks of their own. While the material is relatively consistent, the way the “pearl” swirls are distributed can vary a lot from sheet to sheet. You might find sections with tight, dense pearling or areas that are more open and sparse. This isn’t a defect—just the nature of how the pattern is formed.
Additionally, colors can shift slightly depending on lighting and viewing angle, so a plate that looks crisp under one light may appear softer or more muted under another. It’s worth keeping this in mind when matching to existing finishes or other pickguards.

Shade Differences
When viewed on their own, pearloid plates can be tricky to compare, as the swirling patterns and reflections tend to dominate the eye. This is why side-by-side comparisons are so useful.
A good example shows Black Pearl and Grey Pearl next to each other, alongside Aged White Pearl and standard White Pearl. In this arrangement, the subtle differences in base color, contrast, and reflectivity become much clearer, helping you make a more informed choice.

Knobs
Pearloid pickguards present a unique challenge when it comes to matching knobs, tips, and covers, simply because the base color isn’t uniform. Here’s a practical approach:
-
Aged White Pearl pairs best with Parchment-colored plastics.
-
White Pearl and Avalon work well with standard White plastics.
-
Black Pearl doesn’t match true black knobs perfectly. In fact, it highlights the fact that Black Pearl isn’t genuinely black—but it’s about as close as you’re going to get.

3 and 4 Ply
Pearloid pickguards can be a bit confusing when it comes to ply count, because they don’t always follow the standard dark/light/dark pattern we’ve come to expect.
Essentially, the pearloid layer on the front of the plate counts as a ply. This means:
-
3-ply pearloid plates can appear as just 2 plys, especially on lighter pearls where the pearloid layer is semi-transparent and looks white.
-
4-ply pearloid plates often appear as 3 plys.
In this photo, you can just make out the individual plys and how they layer together.
Tortoise Shells
You’ve probably noticed that we do a huge variety of tortoise shell pickguards – and even then, we barely scratch the surface of the available styles.
Originally, tortoise shell pickguards were made from actual tortoise shell – pieces carefully shaped, joined, and polished until semi-transparent. Some of the earliest acoustic pickguards were made this way. Of course, nobody wants to go back to that practice, but people loved the look. When plastics came along in the early 20th century, they offered a much cheaper and more practical alternative. (Trade in hawksbill turtle shells didn’t become illegal until the 1970s.)
The first plastic tortoise shells were made from celluloid. It’s semi-transparent, with a kind of leopard-skin effect, and it looked gorgeous. Celluloid made its way onto guitars, mostly acoustics, and eventually electrics by the late ’50s and early ’60s. The problem? Celluloid is extremely flammable. Cutting it generates heat, storage is risky, and it’s generally unstable – prone to warping, shrinking, and colour changes under sunlight.
Today, tortoise shells are mostly made from Polyoxymethylene (more stable, but still flammable) or PVC (extremely durable, though it gives off toxic fumes if burned).
For modern pickguards, we typically work with five main variants (ignoring the rare, historical celluloid options). While celluloid still exists and looks incredible for historical accuracy, it’s extremely expensive, difficult to source, and high risk to work with. As a rough guide, sourcing a single celluloid plate could cost upwards of £150.
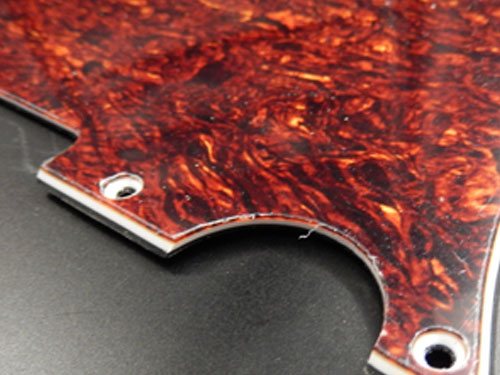
Classic
This is a funny one. For the longest time, it was the only tortoise shell we had access to, and honestly – it’s fine. You see it fairly often on mid-priced guitars like the Squier® Classic Vibe and Vintage Modified lines.
Personally, I think of it as a “cheat” tortoise shell, because it appears to be a screen print sandwiched between layers of PVC. That gives it a slightly flat look, but it’s very uniform. So, if consistency is your goal and you want all your tortoise shells to look the same, Classic is the way to go.
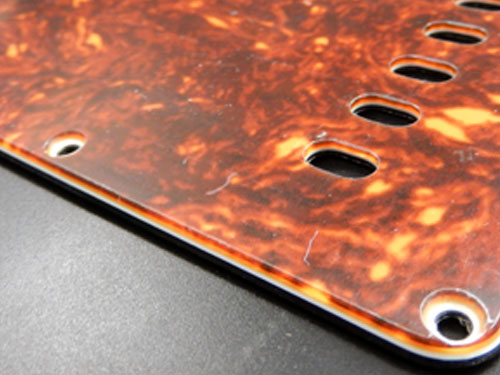
3 Ply Brown
Now we’re talking. Unlike the “flat layer” version, 3 Ply Brown is the real deal – multiple semi-transparent PVC layers (usually one yellow, one brown) overlaid to create that classic tortoise shell effect.
For whatever reason, the 3-ply version tends to show a little more yellow in the mix than the 4-ply, giving it extra depth and richness. If pressed, I’d say it’s my favourite of the tortoise shells.
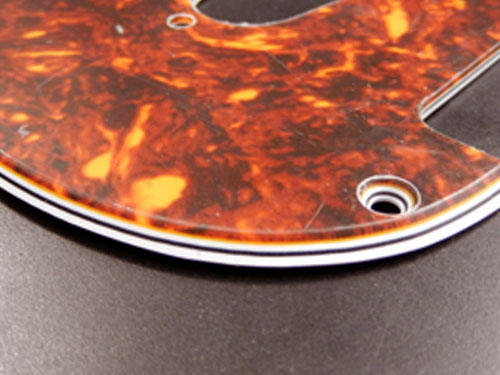
4 Ply Brown
Slightly darker than the 3-ply version, the 4-ply shows less yellow bleed-through in the mix—presumably because the yellow layer is thinner. The overall effect is a richer, more subdued tortoise shell look, while still retaining that classic depth.
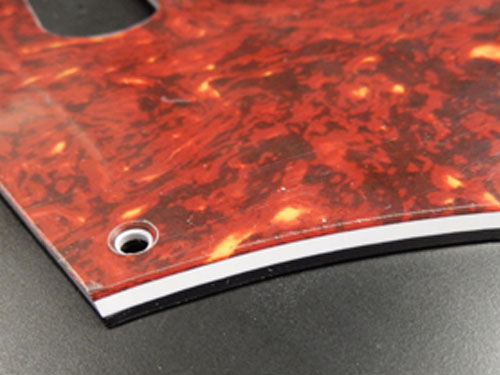
3 Ply Red
Much like the 3-ply brown, this version layers yellow and red PVC, one on top of the other. The principle is the same, but the result is a more vibrant, warmer tortoise shell, giving a slightly livelier appearance on the pickguard.
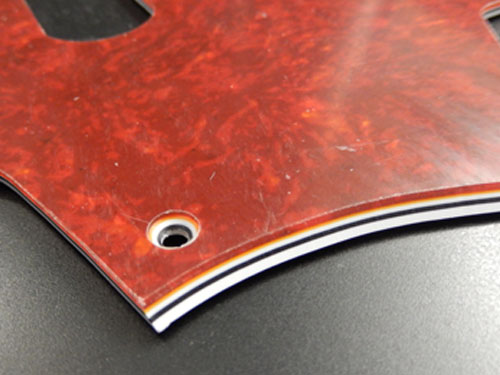
4 Ply Red
In the 4-ply red, the yellow layer is largely removed, leaving a deep, rich red that almost approaches a red pearloid. It’s clean, vibrant, and avoids the subtle yellow tinge you see in the 3-ply version — perfect if you want a striking, uniform red tortoise effect.

Celluloid
For completeness, here’s a look at a celluloid plate. It’s absolutely gorgeous, with incredible depth to the “shell” effect that PVC can’t quite replicate. That said, if you look closely, you’ll notice this Jazzmaster plate has warped significantly. It’s been stored under the same conditions as the PVC plates, but celluloid simply doesn’t age as well — beautiful, but far less stable.
In an ideal world, I wouldn’t have to write this section up, and, I really wish I didn’t have to, but, if I’m being honest and transparent about how pickups work, for better or worse, it’s probably worth being honest and open your rights as a consumer too, and maybe give a little insight into how we actually build pickups.
How we do it
Pickups, at our end of things – are “Custom made” – I cannot stress this enough. When you click the “Add To Cart” button, there is no pickup on the shelf, no bucket of pre-terminated bobbins or half complete pickups. It is made, entirely, from scratch using the parts we have available.
This means, if you order a Bourbon city, or a Hot Iron, or a Texas Blue, it is wound FOR YOU. It is being built to the specifications you have stipulated in the drop-down menus, even the most “normal” design, is still, essentially, built to order.
That entails our pickers collecting the parts from stores, delivering them to the winders, who then get the copper on there, and then the wound coils going to the techs to solder, terminate, test, polish, wax pot, clean, retest… you get the idea.
This is all done “in house” and, obviously, there is a queue, which is first in first out, so pickups will NEVER be shipped same day. Realistically, it takes about 2 weeks, but we do get busier at the beginning/end and middle of the month, so that can have a knock on effect.
And this is all being done, by hand, on a VERY small scale. At maximum, we can produce about 6 pickups a day.
It works wonderfully frankly, because we can make, pretty much, anything you can dream up, and keeping it small scale, means we have an exceptionally high attention to detail with each pickup sold.
Returns
So we have an item, when all is said and done, that didn’t exist until you purchased it, that has cost a lot of man hours to actually manufacture, and has been manufactured to your exact specifications.
As such, pickups come under the remit of “custom work” as laid out under the our terms and conditions, and as outlined in the UK governments distance selling regulations.
This means, in short, pickups are none returnable, and none refundable.
I understand, in this day and age, that may seem quite the hard-nosed approach, but, sadly, there’s no wiggle room in this. Once a pickup is wound, there’s no going back. It belongs to you. There is no “I’ll test it to see if I like it” or “I’ll return it if I don’t like the colour!”.
Warranty
All Axesrus pickups come with a “relaxed lifetime” warranty as far as I’m concerned. I’m never going to ask you to register the purchase, stop offering support 12 months after purchase or limit support to the initial customer in the case of second-hand stuff. We are incredibly proud of the pickups we produce, and I’ll help out wherever I can.
However, its worth laying out what I’d consider “realistic” expectations as to what we will cover as part of a warranty.
Repairs and replacements
Whilst we will not accept pickups as return for refund under any circumstances, we reserve the right to repair or replace any pickup that develops a manufacturing fault within a reasonable time frame.
I won’t put a scale on that time frame, but I will say, its at our discretion. If you’re lucky enough to have some of the VERY early hand wound stuff we made, and we (stupidly) thought we could do it at £20 a pickup, and the coil wires snapped after 10 years? I’m probably not in a position to repair or replace it free of charge, you know? You’ve had your fun; you’ve got your money’s worth!
On the flip side of that – if you’ve bought a £200 humbucker 2 years ago, and it’s developed a fault? You’d better believe Axes is bending over backwards to get it repaired and get you up and running again.
I’ll say this too, we won’t hang you out to dry – if that £20 pickup can be repaired, even if we’re not doing it as part of the warranty, we will offer to repair it at a reasonable price.
Damage vs. Fault
Pickups are delicate creatures I’m afraid. Nature of the beast I suppose, they were never designed, all those years ago, to be “presented” outside of a guitar, so go in knowing this, pickups can be damaged. Either in transit, whilst in storage, or during install.
It is VERY difficult to know how a pickup has developed a fault, so most of the time, we will go into all warranty claims with the mindset that “it’s a manufacturing fault”, frankly, because it keeps everyone happy, avoids any awkward conversations as to “who’s done what” and, normally, repairing damage done during install is the same work as repairing a manufacturing fault either way. Worst case, we might have a delicate email exchange about who’s covering the postage, but that’s about as bad as it gets.
However, we will take this approach only when a pickup, which is showing damage, is only showing minimal damage. I appreciate everyone makes mistakes.
Pickups that have been heavily damaged, have seen heavy wear and tear, or have been intentionally broken in an effort to raise a warranty claim, will see not be repaired, or replaced. Neither free of charge or “for a fee”
Lead times and cancellations
We do publish the lead times on all of our custom build work, and there is very little we can do to decrease the time it takes to actually manufacture this stuff I’m afraid, short of jumping you to the front of the queue (which is never fair, and we won’t do it)
Be aware that once an order is placed, work beings on your build, and as such, you’ve entered into the contract, and there is no backing out. Coils can often be wound within the hour or the order being placed, but they will sit in the work queue due to a back log at terminating/testing/cleaning.
Modifications
There are, occasionally, situations where someone buys a pickup or a wiring loom, installs it, plays it for a while, and then might want something a little different down the line. Maybe a different magnet, or a cover fitting, or a new hookup wire fitting.
I am happy to carry out this work, and, normally, regardless of the “time since purchase”, this will be done simply for the cost of parts and postage.
However, the “depth” of these modifications, and if we’re willing/capable of carrying them out, is at the discretion of Axesrus. We’re happy to discuss this on a case-to-case basis, but go in eyes open, that its unlikely to be part of the warranty.
“Warranty with initial purchase”
I’m not a stickler when it comes to this stuff, but I will say, we do have to draw the line somewhere, so, strictly speaking, this “relaxed warranty” is, officially, limited to the original purchaser of the product.
That said, I’m not a robot, nor am I a fool. I’m aware that sometimes, a pickup is moved on relatively quickly, or is bought by a 3rd party for someone else, so, in these cases, lets just be sensible about it. I’ll carry forward a “true” warranty on a pickup for 12 months after the initial purchase, regardless of who is contacting me in regards to any issue.
However, I will need to know who the initial customer was. Even if it’s just their name and a rough date of purchase.
This goes for technical support too – I’ve no problems offering support on Axesrus products, regardless of “time since purchase”, but I will ask for some proof that they are in fact, Axesrus products.
Modifications to second hand parts, will be dealt with on a case-by-case basis too.
Changes in specification/tolerances
Over the years, we’ve had a few “interesting” conversations regarding pickup specifications, especially when it comes to returns and warranty.
The published specs of our pickups, are published with a “within tolerance” subtext, based off of the readings from our testing equipment.
There will, always, be variation between one pickup and the next, and whilst we endeavor to keep those readings within the tolerances stated, they do occasionally wander outside of the 10% we stipulate as “acceptable” – this is usually due to temperature fluctuation, or specification changes outside of our control (wire diameter, alloy composition etc.) – any resulting change in readings based on these factors, will result in an updated technical spec on the website, but, as you can imagine, the first we know about an unforeseen spec change, is when the pickups come off the winder.
We do not consider these “out of spec” accidents to be cause for a warranty claim I’m afraid, and we endeavor to keep on top of them so the information we’re giving you at point of purchase, is as accurate as possible.
Warranty postage
Repairs or replacement postage cost, outside of an initial 14 day period, is at your cost. I appreciate, in some situations, that this is prohibitive (especially when shipping outside of the UK).
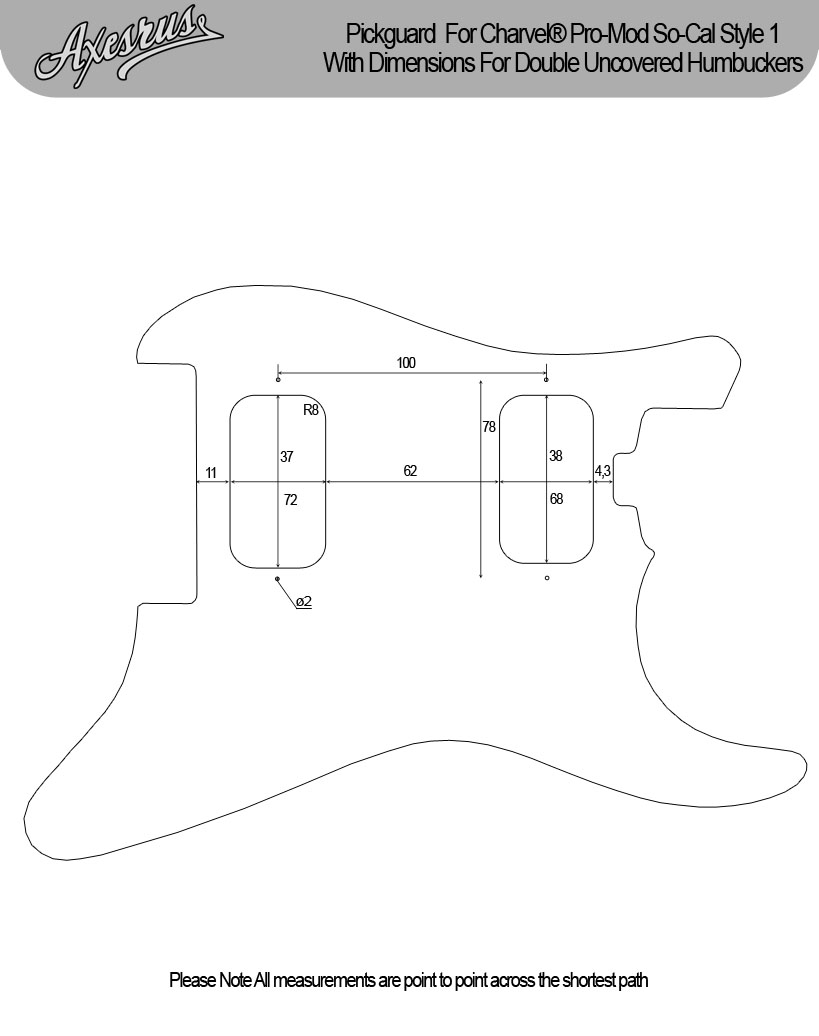
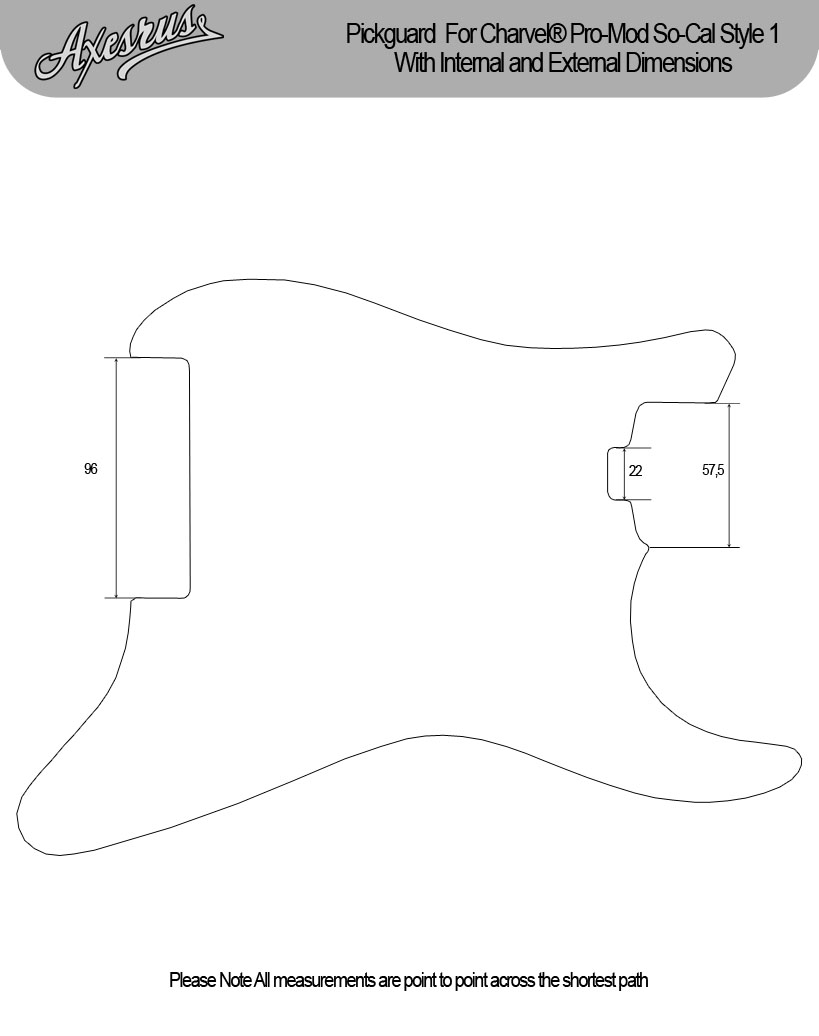
Pickguard Specifications
  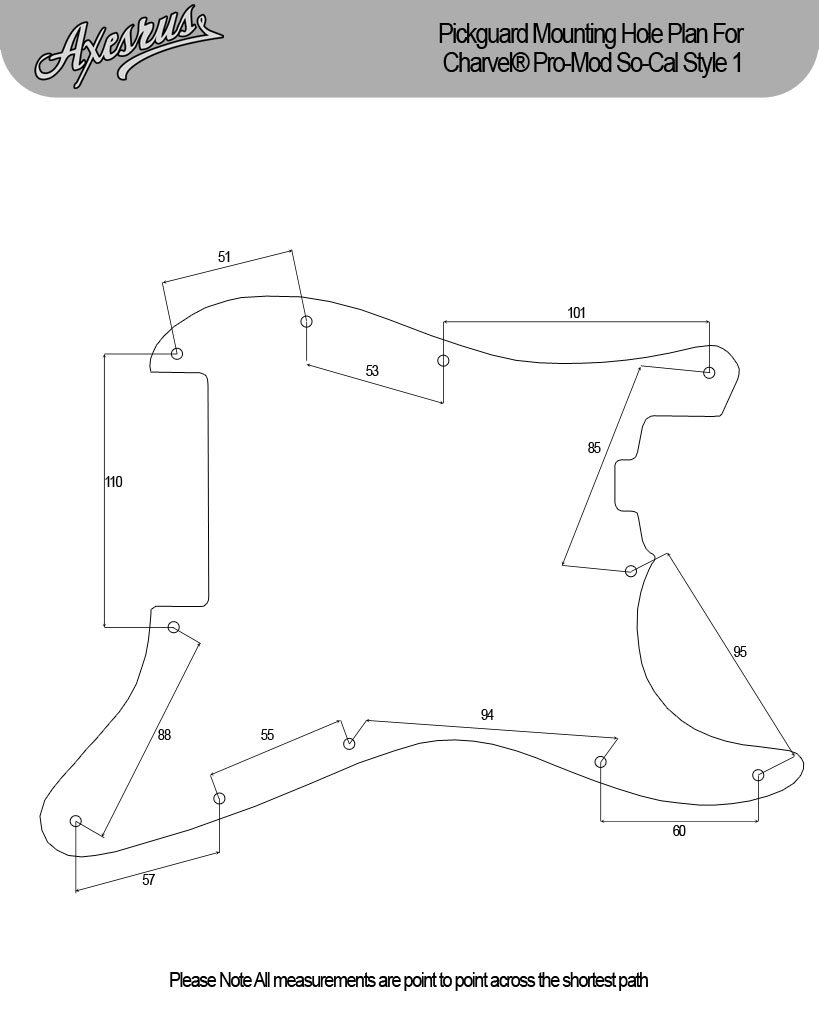
Electronics Specifications
Pots - 500K CTS Pot(s)
Switch - 3 way Oak Grigsby
Jack Socket - Switchcraft Mono
Caps - 0.022 Orange Drops
(If tone selected)
|
Bridge Pickup
|
Middle Pickup
|
Neck Pickup
|
Electronics
|
|
|
|
|
|
Mounting and Ply Options
|
Mounting Screw Pattern
|
Ply Colour and Extra Options
|
Orientation
|
|
|
|
Please note - with the Tortoise Shell plates, 3 ply will show a little more "yellow" in the mix then the 4 ply versions,
The same with Black Pearl - the 3 ply version is lighter then the 4 ply version.
|
|
Truss Rod Access
|
|
|
|
|
|
|
|
 |
|
 |
|



